Pineapple Tarts
Sunday, January 10, 2010Two of my must-have Chinese New Year goodies are open-faced pineapple tarts and love letters. For as far back as I can remember, I have been getting my fix from the same stalls because so many have failed the test of my taste buds :)
This year, I decided to be a little more ambitious and make my own pineapple tarts. I have been told that the reason for their high price is its associated difficulty in making them and so, I decided to make a small batch in my first attempt…just in case…
I was heartened to discover that it was not too difficult really. That first batch also gave me plenty of opportunity to further refine the recipe for tarts better-suited to my family’s taste. The original recipe produced a batch of pineapple filling that gave too much of a sugar rush and I have reduced the amount of sugar as I used honey pineapples. I have also added some salt to the pastry to give a better taste.
Along the way, I have also picked up some useful tricks that made the process easier and I have included them in the revised recipe below. The pineapple filling can be made in advance and chilled. Should the pineapple filling become too sticky to roll between palms, pop it into the refrigerator for a couple of minutes to chill and harden slightly.
We love the homemade pineapple tarts and will be making more batches.
Pineapple Tarts
Ingredients
Pastry:
450 gm plain flour
50 gm milk powder
250 gm butter
1 egg, lightly beaten
2 tbsp iced water
a pinch of salt
a few drops yellow colouring (optional)
Filling:
4 cups lightly-blended pineapple (gently squeeze out some juice)
3 cups sugar
2 cloves
½ inch cinnamon stick
Method
Filling :
1. Place all ingredients into wok or heavy pan.
2. Cook for about 1- 1½ hour over medium heat, stirring occasionally till mixture turns thick and sticky. Allow to cool, then use a cling film to seal and chill in refrigerator.
Pastry :
3. Rub butter into flour and milk powder lightly with fingertips till mixture resembles breadcrumbs. Add beaten egg, water and colouring. Mix lightly, do not overmix.
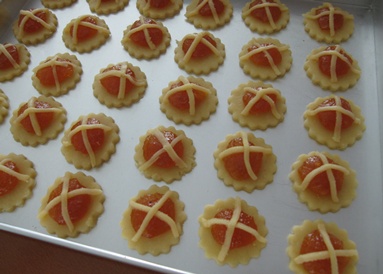
4. Turn out onto lightly floured surface and roll out thinly (about 7mm thickness). Cut with round pastry cutter. Roll out remaining pastry and use a knife to cut into thin strips.
5. Roll a teaspoon of pineapple into a small ball. Flatten it slightly and place it in the centre of each pastry. Place the pastry strips over the tarts.
6. Bake in preheated oven 160oC for 10 min on middle rack. Remove the tray and glaze the tops of the tarts.
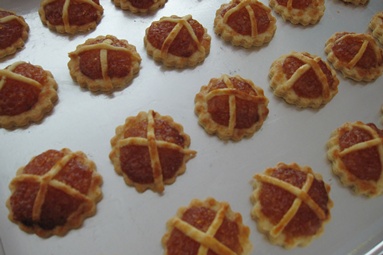
7. Rotate the tray and place it into oven and bake at 150oC for 10-15 min till light brown in colour.
8. Cool completely before storing in sealed container. If stacking tarts in layers, separate each layer with parchment paper.
Reference : Jthorge’s Kitchen
Book Review : Dead Heat
Friday, January 8, 2010My delight was doubled when I picked up Dead Heat by Joel Rosenberg at the library. On first sight, I thought it would be another thriller action novel, along the likes of Dan Brown and James Rollins. The book is a page-turner with its suspense and playout of end-time prophecies.
From the time I had a taste of James Rollins and his mastery in incubating fact with fiction to hatch a fascinating tale of thrilling action, I got hooked onto this style of writing. And so, now Rosenberg presented me with another series of books written along a similar vein. I love how the authors threaded real fact with imagination to weave an almost credible story bordering on real-life investigative work. Some of the plots and subplots mentioned in their books bring a thrill along your spine as they hint of a sinister slant to real world events.
Dead Heat is a roller-coaster ride that had me gripping the political thriller till the end and then, left me rushing to get hold of its earlier prequels. It brings into play Biblical prophecies of the end-times (or eschatology) and shares bone-chilling insights to how it parallels with world happenings as they unfold. What is scarier is that, each of the 5 books in the series was written/published just before the major events mentioned in them happened in our world.
Verdict : 9/10. Two thumbs up!
A New Year Dawns
Friday, January 1, 2010Time flies, the past year’s events seemed to have sped by and we have stepped into another brand new year.
As I read my thoughts at the start of 2009, I reflected on the experiences my family has had in the past year and all I can say is that God was with us through it all. Several major events still linger vividly in my mind and together with many other small seemingly insignificant incidents, they create a tapestry of God’s faithfulness and goodness.
To list some of the memorable events in 2009 here will serve to journal the milestones of 2009.
• Hubby’s eventful year in the marketplace – I am reminded of how we have grown in the Lord and the effective usage of prayer as both a weapon and as a shield.
• My adventures in the kitchen – I am surprised that I have a genuine lasting interest in cooking and baking
• Our selection as parent volunteers at a preferred primary school for Big Buddy – the song “God will make a way” rings loud and clear.
• My onward journey as a Christian leader in my church – I am once again a carecell leader
• New selling strategies in my business – God opens windows when the doors seem to be closed.
• Our 10th Wedding Anniversary celebrations – a second honeymoon and a family photo-shoot session commemorate the special year for us
• Christmas parties with a personal touch – for the first time, I added personal touches to the invitation, menu and program as hosts for a large party
The woven threads of colourful past experiences culminates in a trust that 2010 will be a sweet year in the Lord. There are several decisions to be made this year in conjunction with how my family life will evolve this year. I harbour dreams and desires that in the course of the year, I hope to see come to past. Dear God, I know not how but I know that You can make it happen.
Let the year 2010 surely be a Year of Celebration for my family!
Christmas is a time for family and friends
Tuesday, December 22, 2009Christmas features largely in our annual calendar of celebrations. For our family, it is a busy of the year as we gather at various weekend parties before Christmas.
This year, we decided to organize just one large combined Christmas party for our family and friends instead of segregating the group and having different parties over several days. Also, I felt motivated to add some personal touches to an otherwise outsourced party as we are engaging a caterer to handle the food arrangements for almost a hundred guests.
The Christmas party invites were handmade from cardstock sourced from the craft shop. I decided I did not want a cookie-cutter style and so each invitation card is unique, no two are the same. One side has a shiny-but-slightly-matt surface while the other side sported colourful borders.
For each table group, I made a Christmas Tree centre-piece to add a festive tinge to the room and as a tribute to the season. Chocolate hearts were scattered around its base to bring some colour to the table setting.
The sugar cookies I baked earlier were also left in plates on each table to serve as snacks for those with a penchant for sweet things. The kids loved them and I was so touched that several came up to say how much they liked the cookies.
This is the first time I baked for a large-scale occasion and I was so touched and encouraged when all the shepherd’s pie, fruitcake and brownie squares were polished off. Alas, Hubby and I were so caught up as hosts that we totally forgot to take pictures of the other food once our guests started arriving and we flitted from table to table, chatting and reveling in their company.
After dinner, the kids had fun with a piñata lovingly made by my mother. Using only natural materials, she lent her creative energy to fashion a striking piñata, heavily stuffed with goodies and little knickknacks. My mother truly has a way with kids as she organized the kids program that night and all of them, including the older children, had lots of fun.
It was a really wonderful evening spent with family and friends and a satisfying culmination of weeks’ of preparation, to finally know that it had been one great party.
Fruitcake
Monday, December 21, 2009The really good chock-full-of-fruits-and-nuts kind of fruitcakes cost a fortune in shops. I love those with minimal flour but simply bursting with aged sultanas. My main gripe is that most fruitcakes sold out there are so much more flour than fruit that naming them fruitcakes is in itself a misnomer.
This year, I was determined to make some at home for Christmas this year. I tried and varied this recipe several times along the way, making adjustments to the balance of ingredients as well as baking time, till I settled on what my family feels is a good enough version.
This is one of the heaviest cake, in the literal sense, that I have baked thus far. More than one kilogram of ingredients have gone into the cake and I was glad I did not stinge. Each bite of the fruit cake yielded a mouthful of fruits and nuts.
Truly, may it herald a year of fruitfulness in 2010!
Fruitcake
Ingredients
200 gm unsalted butter
80 gm light brown sugar
80 gm dark brown sugar
2 large eggs
3 tbsp brandy
1 orange
zest (outer yellow skin) of one lemon
50 gm ground almonds
250 gm assortment of dried and candied fruits
500 gm dried raisins/sultanas
210 gm all-purpose flour
¾ tsp baking powder
¼ tsp salt
Method
1) Squeeze out juice of orange and finely grate the skin. Set aside in refrigerator.
2) Line and grease a 9 x 5 x 3 inch baking pan, extend about 2 inches above the pan. Preheat oven to 150oC.
3) Beat the butter and sugars until light and fluffy. Add eggs, one at a time, beating well after each addition. Scrape down the sides of the bowl as needed.
4) Add 2 tbsp of brandy and all the juice and orange and lemon zest. Fold in the ground almond and all the dried and candied fruits and raisins. In a separate bowl, whisk together the flour, salt and baking powder and fold this into the cake batter.
5) Scrape the batter into the prepared pan and bake in the preheated oven for 45 min.
6) Reduce the oven temperature to 140oC and continue to bake the cake for another 1½ hours or until a long skewer inserted into the center of the cake comes out with just a few moist crumbs.
7) Remove the cake from the oven and place on a wire rack to cool completely. With a skewer poke holes in the top surface of the cake and brush it with the remaining brandy .
8) Wrap the cake thoroughly in plastic wrap and aluminum foil and place in a cake tin or plastic bag. Brush the cake once or twice a week with brandy until ready to eat. This cake will keep several weeks or it can be frozen to keep longer.
Reference : Joy of Baking
Sugar Cookies
Sunday, December 20, 2009We will be celebrating Christmas with a party this year. I had a very ambitious plan of preparing some homemade door gifts and googled for some interesting Christmas bakes.
As I tried out some of the recipes, I realized that time is not on my side and the thought of baking a few different offerings as door gifts for a hundred guests proved too daunting. So as a compromise, I decided to make just enough to be eaten at the party itself and gave up the idea of having them as door gifts.
This is one of the recipes that I had fun with – both because of the new experience of using royal icing (something I loved as a young girl) as well as the pretty colours.
Royal icing can be made using egg whites or meringue powder. Due to the risk of salmonella poisoning, I chose to use meringue powder instead. If you difficulty getting your hands on a can of meringue powder, you can search for a recipe using egg whites instead.
I had no idea of the huge variety of food colouring that was available till I stepped into Phoon Huat. There were bottles of liquid food colours, tubes of both white and coloured gel pastes. On top of that, there were the various sizes of icing nibs, squeeze bottles, icing bags and icing in ready-to-use disposable tubes.
It was really fun icing the cookies but if you plan not to frost the baked cookies, you may like to sprinkle the unbaked cookies with crystal or sparkling sugar before popping them into the oven.
Sugar Cookies
Ingredients
Sugar Cookie :
3½ cups (or 460 gm) all purpose flour
¼ tsp salt
1 tsp (or 4 gm) baking powder
1 cup (or 227 gm) unsalted butter, room temperature
1½ cups (or 300 gm) granulated white sugar
2 large eggs
2 tsp pure vanilla extract
Royal Icing :
1 cup (or 110 gm) confectioners' (powdered or icing) sugar, sifted
¾ tbsp (or 30 gm) meringue powder
Some warm water
Food Coloring
Hundreds and Thousands decoration
Method
Sugar Cookie :
1) In a separate bowl whisk together the flour, salt and baking powder. Set aside.
2) Beat butter and sugar until light and fluffy (about 3 to 4 minutes).
3) Add eggs and vanilla extract, and beat until combined. Add the flour mixture and beat until a smooth dough is formed.
4) Divide the dough into smaller portions, wrap each portion in plastic wrap and put into refrigerator. Refrigerate overnight or until firm enough to roll.
5) Preheat oven to 350 degrees F (or 170o C) and place rack in center of oven.
6) Remove one portion of chilled dough from the refrigerator. On a lightly floured surface, roll the dough to a thickness of ¼ inch (1 cm).
7) Cut out desired shapes using a lightly floured cookie cutter and transfer cookies to a baking tray, lined with baking sheet. Place the tray of unbaked cookies in the refrigerator for 15 min to chill the dough to prevent the cookies from spreading and losing their shape while baking.
8) Bake cookies for about 10 min (depending on size) or until they are brown around the edges. Remove from oven and leave to cool on baking tray for a few minutes before transferring to a wire rack to finish cooling.
9) When cookies are completed cool, frost with royal icing, if desired. Be sure to let the royal icing dry completely before storing in an airtight container between layers of parchment paper or wax paper.
Royal Icing :
1) Beat the confectioners' sugar and meringue powder until combined.
2) Add water a little at a time to get the right consistency and beat on medium to high speed until very glossy and stiff peaks form (5 to 7 minutes).
3) Separate the icing into as many portions as required for different colours and/or consistencies.
For out-lining, the proper consistency should be glossy with stiff peaks.
For covering or 'flooding' the entire surface of the cookie with icing, the proper consistency is when you lift the beater, the ribbon of icing that falls back into the bowl remains on the surface of the icing for a few seconds before disappearing.
4) Add food colouring to the royal icing to obtain desired colour. Use a toothpick and add minute amounts at a time, a little goes a long way.
6) After frosting, add further decorations if desired.
7) The icing needs to be used immediately or transferred to an airtight container as royal icing hardens when exposed to air. Cover with plastic wrap when not in use.
Reference : Joy of Baking
Restore Soft Biscuits to Crispy Ones
Thursday, December 17, 2009Alas! The batch of cookies I made for a Christmas party this weekend had gone soft. I have been wondering how to restore their crispiness as a layer of royal icing on them complicates matters. Previous times, I just popped them into the oven for a couple of minutes and then let them cool on a wire rack. However, the royal icing on this batch of cookies makes this method unusable. It just will not do for the cookies to be crispy again only to end up with a messed-up blob of watery icing on its top.
So when I chanced upon this method, I was eager to give it a try and…it really works!
This method requires some care to calibrate the amount of microwave time required to warm the biscuits/crisps etc rather than overheat them, but once this has been established, the process is repeatable.
I am told that this same technique works for potato chips and other crispy snacks too. Do note that for items that have fillings or coatings that melt under high heat (such as chocolate or jam biscuits), take extra care to limit the heating such that it does not melt the filling/coating. Instead, more cycles of the process can be applied.
lllllllllllllllllllllllllllllllllllllll
Method
1. Get several cold ceramic dinner plates by putting them into the refrigerator for a couple of minutes.
2. Put a few of the soft biscuits on a plate and put it in the microwave oven. Give it a blast for just long enough to warm up the biscuits but not cook them.
3. Take the plate out of the oven and transfer the warmed biscuits onto a cold ceramic plate. What happens is the moisture in the biscuits evaporates without boiling and then condenses on the cold surface of the plate.
4. Transfer the biscuits onto another cold plate. Dry the first plate, and repeat the process a few times. After several cycles of the process, the biscuits will be dry and crispy.