Showing posts with label gastronomic. Show all posts

Sliced Fish Yee Mee

Sunday, January 24, 2021

My husband has always advocated us to eat healthily and this is a recipe that has been well-loved by everyone at home.  So, I am saving it here for easy future reference.


Sliced Fish Yee Mee 


Ingredients

1 litre water
80 gm ikan bilis, rinsed
1 stalk celery, chopped
1 onion, quartered
1 packet Hong Kong Yee Fu Mee
1 1⁄2 tbsp cooking oil
3 cloves garlic, finely chopped
3 slices ginger
400 gm batang fish, sliced
8 stalks xiao bai cai
2 tbsp oyster sauce
1 tbsp fish sauce
1 tbsp Chinese cooking wine
Salt and pepper, to taste
2 tsp corn flour, mixed with 50ml water


Method

1. Place the water, ikan bilis, celery and onions in a pot and boil for 15 min.  Strain and set aside the stock.

2. Blanch the noodles in boiling water for 2-3 min until just cooked. Drain and set aside.

3. Add the oil, garlic and ginger to a hot wok. Stir fry until the ginger sizzles then add the sliced fish and stir-fry until cooked.

4. Add 750 ml of the ikan bilis stock, xiao bai chye, oyster sauce, fish sauce, Chinese cooking wine, salt, pepper and the noodles. Cover and boil for 1 min. Thicken with the corn flour mixture and mix well.

5.  Serve in bowls and eat while hot.


Reference : Her World

Chocolate Muffins

Saturday, May 23, 2020

I was trawling the internet for a 'chocolate cum chocolate' muffin recipe and this caught my eye as it seems so easy to do and had good ratings.  I had tried other recipes but they turned out to somewhat lacking in the degree of chocolate-ness as deemed by my kiddos. 

The recipe called for buttermilk which I substituted with 1 tablespoon of white vinegar to which enough milk was added to make up 1 cup.


I was excited when the muffins came out dark brown, almost blackish.  Surely, it hints at the amount of chocolate in it.  And it looked moist too!


Chocolate Muffins 


Ingredients

2 large eggs
1 cup buttermilk
2 tsp vanilla extract
210 gm all-purpose flour

83 gm unsweetened cocoa powder
250 gm light brown sugar (without lumps)
2 tsp baking powder
150 gm chocolate chips
110 gm salted butter (melted, slightly cooled) 


Method

1. Place rack in centre of oven and preheat oven to 220 oC. Line muffin pan with liners.

2. In a large bowl, whisk together eggs, buttermilk and vanilla extract.

3. In another large bowl, whisk together flour, cocoa powder, brown sugar, baking powder.  Break up any lumps of brown sugar.

4. To the bowl of dry ingredients, add the wet ingredients and chocolate chips. Mix until well combined.

5.  Using 2 tablespoons, fill the muffin cups to the brim. You may choose to lightly press some more chocolate chips onto the top of the filled cups.

6.  Place into oven and bake for 8 minutes. Turn down oven temperature to 175 oC and bake for another 12 minutes or until a toothpick inserted into the middle of cupcake exits clean.

7.  Transfer to wire rack to cool.


Reference : Once Upon A Chef

Ipoh Hor Fun with Mushroom and Shredded Chicken

Saturday, May 2, 2020

To say that the last time I posted was a long time ago would be an understatement since it has been years. Due to the Covid-19 pandemic, the Circuit Breaker policy has been implemented in Singapore to interrupt transmission cycles. With the adults in the household are working from home and the kids doing home-based learning, our meals are starting to get boring.

And so I started exploring some new recipes to inject some further varieties. Some are excellent hits and those recipes are definitely keepers for my family, so I am posting some of them here to save myself from hunting for good recipes when that craving for specific dishes hits us again.


We love chinese food and this is one that I always enjoy. However, ordering it back as a take-away sometimes results in a gooey mess that does no justice to an otherwise excellent meal.

So I decided to attempt this at home instead.

I did not try it for taste whilst cooking but it turned out amazingly perfect. My fusspots are now older and are more vocal about what tastes good and what warrants a thumbs down. It is with great satisfaction that they slurped this up and the younger one gave a nod when I asked if he enjoyed it.  


Ipoh Hor Fun with Mushroom and Shredded Chicken 


Ingredients

500 gm Ipoh hor fun
1½ chicken breast (adjust if you prefer more/less chicken meat with the dish)
2 packets Xiao Bai Chai
4 dried mushrooms (rinse and soak till softened, remove stems and slice, keep the water)

Gravy :
250 ml chicken broth (I use Swanton's instant chicken broth)
2 bowls of mushroom water (from soaking the mushroom)
1 tsp sesame oil
2 tbsp oyster sauce
2 tbsp dark soy sauce
2 tbsp light soy sauce
1 tbsp sugar

Thickening Agent :
1 tbsp corn starch with 1 tbsp water (for thickening of gravy)


Method

1. Wash chicken breast and pat dry. Rub in ½ tsp salt, dash of pepper and ½ tsp sesame oil. Leave in refrigerator to season at least 1 hour. 


2. Cook chicken breast meat in boiling water. Remove and set aside. Shred the meat when cool.

3. Blanch the Xiao Bai Chye. Set aside.

4. Blanch the Ipoh hor fun in boiling water. Remove, drain and apportion onto serving plates.

5.  Add mushrooms and all ingredients for gravy into saucepan.  Allow it to come to a boil.

6.  Add thickening agent. Let it continue to simmer, stirring to prevent starchy lumps from forming.

7.  Apportion shredded chicken, Xiao Bai Chye and mushrooms onto serving plates. Spoon gravy over the hor fun.

8.  Serve with sliced green chillies on the side.


Reference : The Fussy Palate

Oreo and Raisin Cupcake

Friday, September 11, 2015


My boys have a weakness for cupcakes but what with the eye-popping prices of commercially available ones, I figure it would make more sense making our own.  Coming from our own kitchen also means that I can cut down on the sugar (read as less hyper kids) and minus the cream frosting that we do not fancy.

There are loads of cupcake recipes everywhere but I decided to give this a try as it seems more likely to be accepted by my children.  I loathe to try something with fanciful names and ingredients but to have it rejected outright by the fusspots at home.

The cupcakes turned out good and not cloyingly sweet.  I guess the highest praise came from my younger son who said he would sell the cupcakes to his friends!  The joys of motherhood, no less :)


Oreo and Raisin Cupcake


Ingredients

235 gm self-raising flour
100 gm Oreo biscuits, chopped
40 gm raisins
230 gm unsalted butter
180 gm sugar
4 eggs
¼ tsp salt (omit if using salted butter)


Method

1. Beat butter, salt and sugar till slightly creamy.  Add eggs and flour and mix till well combined. Then beat at higher speed until smooth and pale, takes about 2 to 3 minutes.

2. Stir in chopped oreo biscuits and raisins.  Mix evenly and spoon mixture into paper cups.

3. Bake at 190 oC for 20 minutes or until cooked.

4. Remove from oven and cool on cooling rack.


Reference : Aunty Yochana

Baking Conversions

Tuesday, August 18, 2015


I am terrible at metric conversions and I always struggle to find the right conversions for the quantities mentioned in the recipes I want to try.  It is a hassle to have to pause and try to figure out the correct amounts in the units that I am used to.  

So I have finally decided to track down something that I can use at just a glance.  Phew!


Ingredient Measurements

All-Purpose Flour
1 cup
120 grams
Cake Flour
1 cup
95 grams
Dark / Brown Sugar
1 cup
200 grams
Granulated / Castor Sugar
1 cup
225 grams
Icing / Powdered Sugar
1 cup
120 grams
Butter / Margarine
1 cup
225 grams
Cocoa Powder
1 cup
125 grams


Volume

1 cup
240 ml
1 quart (4 cups)
960 ml


Oven Temperature

225 F
110 oC
250 F
130 oC
275 F
140 oC
300 F
150 oC
325 F
165 oC
350 F
175 oC
375 F
190 oC
400 F
200 oC
425 F
220 oC
450 F
230 oC
475 F
245 oC
500 F
260 oC
550 F
290 oC

Chocolate Chip Cookies

Thursday, January 5, 2012

My kids love chocolate cookies and this is a useful recipe to have around.


Chocolate Chip Cookies


Ingredients

1 cup (226 grams) unsalted butter, room temperature
¾ cup (150 grams) granulated white sugar
¾ cup (160 grams) firmly packed light brown sugar
2 large eggs
1½ teaspoons pure vanilla extract
2¼ cups (295 grams) all-purpose flour
1 teaspoon baking soda
½ teaspoon salt
1½ cups (270 grams) semisweet chocolate chips
1 cup (100 grams) walnuts or pecans, coarsely chopped (optional)


Method

1. Preheat oven to 180 degrees C with rack at bottom of oven. Line two baking sheets with parchment paper.

2. Beat the butter until smooth and creamy. Add the white and brown sugars and beat until fluffy (about 2 minutes). Beat in eggs, one at a time, making sure to beat well after each addition. Add the vanilla and beat until incorporated. Scrape down the sides of the bowl as needed.

3. In a separate bowl, combine flour, baking soda, and salt. Add the dry ingredients to the egg mixture and beat until incorporated, adding the chocolate chips and nuts (if using) about half way through mixing.

4. If the dough is very soft, cover and refrigerate until firm (about 30 minutes).

5. For large cookies, use about a 2 tablespoon ice cream scoop or with two spoons, drop about 2 tablespoons of dough (35 grams) onto the prepared baking sheets. Bake about 12 - 14 minutes, or until golden brown around the edges.

6. Cool completely on wire rack.


Note: You can freeze this dough. Form the dough into balls and place on a parchment lined baking sheet. Freeze and then place the balls of dough in a plastic bag, seal, and freeze. When baking, simply place the frozen balls of dough on a baking sheet and bake as directed - may have to increase baking time a few minutes.


Reference : Joy Of Baking

Muah Chee

Monday, January 2, 2012

Muah Chee is a popular snack amongst the old and young and it is so simple to make at home. It takes just a few minutes and we usually make it at home at the spur of the moment, when the fancy for a sweet snack arises.


Muah Chee


Ingredients

250 gm glutinuous rice flour
300 ml water
Some oil for greasing
Ground peanut and sugar powder


Method

1) Mix flour and water. Stir until there are no lumps.

2) Grease pan and pour mixture into it.

3) Steam for 20 mins then remove from heat.

4) Cut dough into small pieces with scissors and pour onto a large plate of peanut powder. Mix pieces of muah chee in the powder until each piece is well covered in peanut powder.

5) Serve warm.

Ultimate Chocolate Cake

Wednesday, December 28, 2011


Every year, we buy a log cake as part of our family’s Christmas dinner spread. I personally do not enjoy most commercially prepared log cakes because I find it too creamy for my palate and sometimes, it even borders towards an oily feel to the cake.

This year, since we were going to have a non-Western dinner theme, I decided to throw tradition to the winds and just went ahead with a non Christmasy cake. Since we are all a little chocolate-mad, I decided to try a chocolate cake recipe and chanced upon this.

As I did not have all the required ingredients on hand, I substituted light muscovado sugar with just caster sugar and made my own buttermilk.

I also used strawberries to decorate the cake instead and found the tartness of the fruit offsets the sweetness of the cake well.


Ultimate Chocolate Cake

Ingredients

Cake :
200 gm good quality dark chocolate , about 60% cocoa solids
200 gm butter , cut in pieces
1 tbsp instant coffee granules
85 gm self-raising flour
85 gm plain flour
¼ tsp bicarbonate of soda
200 gm light muscovado sugar
200 gm golden caster sugar
25 gm cocoa powder
3 medium eggs
75 ml buttermilk (5 tbsp)
grated chocolate or curls, to decorate

Ganache :
200g good-quality dark chocolate , as above
284ml carton double cream (pouring type)
2 tbsp golden caster sugar

Buttermilk Substitute :
1 cup milk
1 tbsp vinegar or lemon juice

Add vinegar/lemon juice to milk and let stand for 10 min before using in recipe.

Method

1. Grease a 20cm round cake tin (7.5cm deep) and line the base.

2. Preheat the oven to fan 140C/conventional 160C/ gas 3.

3. Break the chocolate in pieces into a medium heavy-based pan and tip in the butter. Mix coffee granules into 125 ml cold water and pour into the pan. Warm over a low heat just until everything is melted – do not overheat.

4. While the chocolate is melting, mix the two flours, bicarbonate of soda, sugars and cocoa in a big bowl. Mix to get rid of any lumps.

5. Beat the eggs in a bowl and stir in the buttermilk.

6. Pour the melted chocolate mixture and the egg mixture into the flour mixture. Stir just until everything is well blended with a smooth, quite runny consistency. Pour into the baking tin.

7. Bake for 90 min or until a skewer inserted into the centre comes out clean. The top should feel firm, do not worry if it cracks a bit. Leave to cool in the tin (do not worry if it dips slightly), then turn out onto a wire rack to cool completely. When the cake is cold, cut it horizontally into three layers.

8. To make the ganache, chop the chocolate into small pieces and tip into a bowl.

9. Pour cream into a pan, add sugar and heat until it is about to boil. Remove pan from heat and pour it over the chocolate. Stir until the chocolate has melted and the mixture is smooth.

10. Sandwich the layers together with just a little of the ganache. Pour the rest over the cake letting it fall down the sides and smoothing to cover with a palette knife. Decorate with grated chocolate or a pile of chocolate curls.


Reference : BBC GoodFood

Crispy Pork Belly

Saturday, December 25, 2010

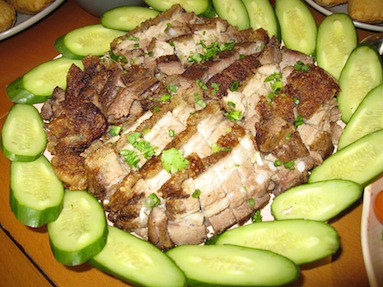
Crispy Roast Pork Belly

One of the most common dish at Christmas is the turkey but being in a Chinese family, it was never our tradition to celebrate Christmas with a turkey. And so tasked with a Christmas dinner to be prepared with the elder generation as guests, I decided to skip that celebrated bird altogether and go for a roast dish that is more Asian in nature and hopefully more palatable for my guests.

And was I glad to have made that decision. The Roast Pork Belly was welcomed by all and declared excellent by my family and relatives – a near-impossible feat as they are experienced cooks themselves.

To be honest, it was my maiden attempt doing it at home and without a proper oven to boot. The night before I was still poring over my microwave oven’s user manual, trying to figure out how to get to the roast function. The manual was too skimpy to be adequately helpful but the closest I could get to was to use the Combination 5 function which meant that the food would be cooked at the temperature closest to what the recipe called for. I knew it was going to be a huge gamble because there was no mention of what the Combination function actually does!

So I was really relieved when the Roast Pork Belly turned out beautifully and everyone had a good time feasting together.


Crispy Roast Pork Belly


Ingredients

1kg pork belly with skin on
1 tbsp salt
1 tbsp Chinese five spice powder
Some Popiah sweet sauce


Method

1. Fill a wok with enough water to submerge the pork belly and bring to a boil. When water is boiled, turn off heat and scald pork belly in wok for 15 min. (Parboiling the meat helps remove its odour) Remove the pork belly and discard water.

2. Place pork belly with meat on work surface and skin facing up. Stab skin vigorously with fork, leaving small gaps between punctures made to allow skim to blister nicely during roasting.

3. Rub salt and Chinese five spice powder all over the pork.

4. Preheat oven at maximum for 15 min. Place pork belly on roasting rack with skin facing upwards. Roast at 220 deg Celsius for 1 hour.

5. Remove from oven. Knock all over the skin with spoon. It is ready if it makes a sound like when a spoon is knocked against a hard surface. Otherwise, return to roast for 20-30 min or until skin is crispy.

6. Place pork belly on chopping board with skin facing down and cut to desired size.

7. Serve with drizzle of Popiah sweet sauce, if desired.


Reference : Care Cook Connect

Lemon Drizzle Cake

Tuesday, June 1, 2010

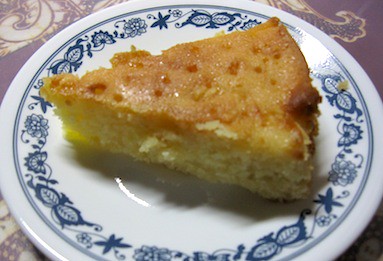
Lemon Dizzle Cake

I love the tangy perk-me-up smell and taste of lemony cakes. I still remember the very first time I tried a lemon cake with poppy seeds at a local bakery. I loved it so much that I was devastated when they retired the recipe. Try I did, to find another bakery offering that same kind of delicious, tastebud tingling orange/lemon cakes, but I was sorely disappointed.

So imagine my excitement when I came across this recipe in The Sunday Times! It looked so simple that I had to give it a try and it turned out so good that I baked it several more times after that first attempt.

The original recipe calls for the zest of the lemon to be added to the creamed mixture. To be honest, I forgot to do that and ended with a ‘zest-less’ Lemon Drizzle Cake but since everyone commented how good it tasted, I decided to omit it completely when I baked it again. This is also partly because I personally find the zest of lemons and oranges bitter and I do not enjoy it. But should your tastebuds differ, you may add the zest of one lemon to the creamed mixture along with the ground almonds and lemon juice.


Lemon Drizzle Cake


Ingredients

Cake :
200 gm butter
200 gm castor sugar
3 eggs
150 gm plain flour
1 tsp baking powder
30 gm ground almond
Juice of 1 lemon

Drizzle Topping :
Juice of 1 lemon
60 gm castor sugar

Method

1. Pre-heat oven to 170 deg C.

2. Beat butter and sugar together until pale and creamy.

3. Beat eggs one by one into the creamed butter and sugar. Add a little flour if the mixture starts to curdle

4. Sift flour and baking powder together into a separate bowl. Stir into the creamed mixture, along with ground almond and lemon juice. The mixture should now be thick and creamy.

5. Grease the bottom and side of a 26cm diameter baking pan and line the bottom with baking paper. Spoon the mixture into the pan and smooth the top flat.

6. Bake in the pre-heated oven for about 35 min or until a skewer inserted into the cake comes out clean. The top should be light and springy when touched.

7. While the cake is baking, prepare the lemon drizzle by mixing the juice and sugar in a small bowl.

8. When the cake is taken out of the oven, prick small holes across the top with a bamboo skewer. Slowly pour the drizzle mixture across the entire surface.

9. Cut into wedges and serve on its own or with a scoop of ice-cream.


References : The Sunday Times, 2 May 2010

Chinese Glutinous Rice

Sunday, May 30, 2010

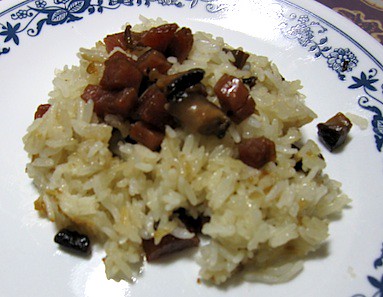
Chinese Glutinous Rice

This is my second time cooking this dish. My family loved it so much the first time (yes, even those fussy tastebuds gave their approval ☺), they gave me the confidence to whip it up again.

This recipe calls for white rice to be mixed with glutinous rice, resulting in a concoction with a softer bite that also does not give rise to a ‘bloated feeling’ after consumption – most welcomed by older folks who are prone to indigestion.

There are many variations to the recipe. You can also consider adding dried shrimp and garnish with pork/chicken floss before serving.


Chinese Glutinous Rice

Ingredients

1½ cups glutinous rice
½ cup white rice
3 Chinese sausages
8 dried mushrooms
½ yellow or white onion
2 stalks green onions
1 cup chicken broth or stock
1 tbsp rice wine
2 tsp soy sauce
1 tbsp oyster sauce

Method

1. Rinse the glutinous rice and soak it overnight in cold water. Do likewise for the dried mushrooms.

2. Chop the onion and green onion. Set the green onion aside in the fridge under a damp paper towel for garnish.

3. Remove the mushroom from the water but keep the soaking liquid. It will be used to cook the rice to infuse it with the mushroom flavor. Remove the mushroom stems and chop the mushrooms finely.

4. Slice the Chinese sausage into quarters lengthwise. Then chop those quarters into small pieces.

5. Heat a large frying pan or wok on medium-high until a drop of water sizzles. Combine the sausage, onion and mushrooms and place in the pan. Do not add extra oil because the sausage has plenty of fat to fry the mushrooms and onions. Add rice wine and stir-fry until the onions have turned golden brown, about 5 minutes. Add soy sauce and oyster sauce to the mixture. Be careful not to add too much, although at this point it will be excessively salty because it will also flavour the rice later. Stir fry till the onions have softened and that the sausage has browned nicely. Dish up the mixture and set aside.

6. Drain the rice and put into a medium to large pot with a lid. Pour in equal parts of the liquid used to soak the mushrooms and chicken broth. The liquid should just cover the rice. Cover the pot, keeping the lid to one side to let a small opening for steam to escape. Turn the heat to medium-low.

7. When the rice has absorbed some of the liquid, spoon the fried mixture over the rice. Do not stir or otherwise disturb the rice as it is will not be sufficiently cooked yet. Cover the pot and let it cook for an additional 10 minutes or so.

8. When the rice has finished cooking and absorbed all of the free-standing liquid, stir the rice to incorporate all the ingredients together. If necessary, add additional oyster sauce to taste.

9. Garnish with green onion and serve.


Reference : Destination Eats

Pineapple Tarts

Sunday, January 10, 2010

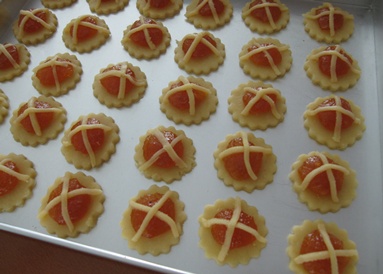
Pineapple Tarts Unbaked

Two of my must-have Chinese New Year goodies are open-faced pineapple tarts and love letters. For as far back as I can remember, I have been getting my fix from the same stalls because so many have failed the test of my taste buds :)


Pineapple Tarts Baked

This year, I decided to be a little more ambitious and make my own pineapple tarts. I have been told that the reason for their high price is its associated difficulty in making them and so, I decided to make a small batch in my first attempt…just in case…

I was heartened to discover that it was not too difficult really. That first batch also gave me plenty of opportunity to further refine the recipe for tarts better-suited to my family’s taste. The original recipe produced a batch of pineapple filling that gave too much of a sugar rush and I have reduced the amount of sugar as I used honey pineapples. I have also added some salt to the pastry to give a better taste.

Along the way, I have also picked up some useful tricks that made the process easier and I have included them in the revised recipe below. The pineapple filling can be made in advance and chilled. Should the pineapple filling become too sticky to roll between palms, pop it into the refrigerator for a couple of minutes to chill and harden slightly.

We love the homemade pineapple tarts and will be making more batches.


Pineapple Tarts


Ingredients

Pastry:
450 gm plain flour
50 gm milk powder
250 gm butter
1 egg, lightly beaten
2 tbsp iced water
a pinch of salt
a few drops yellow colouring (optional)

Filling:
4 cups lightly-blended
pineapple (gently squeeze out some juice)
3 cups sugar
2
cloves
½ inch
cinnamon stick


Method

Filling :

1. Place all ingredients into
wok or heavy pan.

2. Cook for about 1- 1½ hour over medium heat, stirring occasionally till mixture turns thick and sticky. Allow to cool, then use a cling film to seal and chill in refrigerator.


Pastry :

3. Rub butter into flour and milk powder lightly with fingertips till mixture resembles breadcrumbs. Add beaten egg, water and colouring. Mix lightly, do not overmix.

4. Turn out onto lightly floured surface and roll out thinly (about 7mm thickness). Cut with round pastry cutter. Roll out remaining pastry and use a knife to cut into thin strips.

5. Roll a teaspoon of pineapple into a small ball. Flatten it slightly and place it in the centre of each pastry. Place the pastry strips over the tarts.

6. Bake in preheated oven 160oC for 10 min on middle rack. Remove the tray and glaze the tops of the tarts.

7. Rotate the tray and place it into oven and bake at 150oC for 10-15 min till light brown in colour.

8. Cool completely before storing in sealed container. If stacking tarts in layers, separate each layer with parchment paper.


Reference : Jthorge’s Kitchen

Christmas is a time for family and friends

Tuesday, December 22, 2009

Christmas features largely in our annual calendar of celebrations. For our family, it is a busy of the year as we gather at various weekend parties before Christmas.

This year, we decided to organize just one large combined Christmas party for our family and friends instead of segregating the group and having different parties over several days. Also, I felt motivated to add some personal touches to an otherwise outsourced party as we are engaging a caterer to handle the food arrangements for almost a hundred guests.

The Christmas party invites were handmade from cardstock sourced from the craft shop. I decided I did not want a cookie-cutter style and so each invitation card is unique, no two are the same. One side has a shiny-but-slightly-matt surface while the other side sported colourful borders.


Christmas Party Invitation Front


Christmas Party Invitation Back


For each table group, I made a Christmas Tree centre-piece to add a festive tinge to the room and as a tribute to the season. Chocolate hearts were scattered around its base to bring some colour to the table setting.
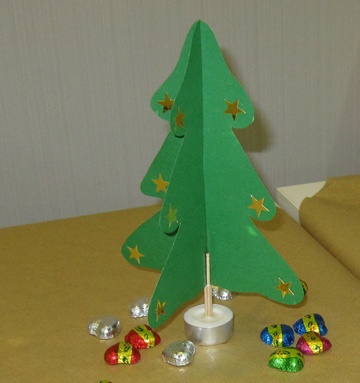

Christmas Tree Gold


The sugar cookies I baked earlier were also left in plates on each table to serve as snacks for those with a penchant for sweet things. The kids loved them and I was so touched that several came up to say how much they liked the cookies.


Sugar Cookies Plate


This is the first time I baked for a large-scale occasion and I was so touched and encouraged when all the shepherd’s pie, fruitcake and brownie squares were polished off. Alas, Hubby and I were so caught up as hosts that we totally forgot to take pictures of the other food once our guests started arriving and we flitted from table to table, chatting and reveling in their company.


Sidetable of Cakes and Pastries


After dinner, the kids had fun with a piñata lovingly made by my mother. Using only natural materials, she lent her creative energy to fashion a striking piñata, heavily stuffed with goodies and little knickknacks. My mother truly has a way with kids as she organized the kids program that night and all of them, including the older children, had lots of fun.


Pinata Butterfly


Pinata Fish


It was a really wonderful evening spent with family and friends and a satisfying culmination of weeks’ of preparation, to finally know that it had been one great party.

Fruitcake

Monday, December 21, 2009

Fruitcake

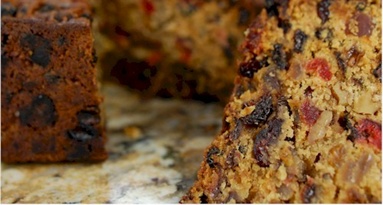
The really good chock-full-of-fruits-and-nuts kind of fruitcakes cost a fortune in shops. I love those with minimal flour but simply bursting with aged sultanas. My main gripe is that most fruitcakes sold out there are so much more flour than fruit that naming them fruitcakes is in itself a misnomer.

This year, I was determined to make some at home for Christmas this year. I tried and varied this recipe several times along the way, making adjustments to the balance of ingredients as well as baking time, till I settled on what my family feels is a good enough version.

This is one of the heaviest cake, in the literal sense, that I have baked thus far. More than one kilogram of ingredients have gone into the cake and I was glad I did not stinge. Each bite of the fruit cake yielded a mouthful of fruits and nuts.

Truly, may it herald a year of fruitfulness in 2010!


Fruitcake


Ingredients

200 gm unsalted butter
80 gm light brown sugar
80 gm dark brown sugar
2 large eggs
3 tbsp brandy
1 orange
zest (outer yellow skin) of one lemon
50 gm ground almonds
250 gm assortment of dried and candied fruits
500 gm dried raisins/sultanas
210 gm all-purpose flour
¾ tsp baking powder
¼ tsp salt


Method

1) Squeeze out juice of orange and finely grate the skin. Set aside in refrigerator.

2) Line and grease a 9 x 5 x 3 inch baking pan, extend about 2 inches above the pan. Preheat oven to 150oC.

3) Beat the butter and sugars until light and fluffy. Add eggs, one at a time, beating well after each addition. Scrape down the sides of the bowl as needed.

4) Add 2 tbsp of brandy and all the juice and orange and lemon zest. Fold in the ground almond and all the dried and candied fruits and raisins. In a separate bowl, whisk together the flour, salt and baking powder and fold this into the cake batter.

5) Scrape the batter into the prepared pan and bake in the preheated oven for 45 min.

6) Reduce the
oven temperature to 140oC and continue to bake the cake for another 1½ hours or until a long skewer inserted into the center of the cake comes out with just a few moist crumbs.

7) Remove the cake from the oven and place on a wire rack to cool completely. With a skewer poke holes in the top surface of the cake and brush it with the remaining brandy .

8) Wrap the cake thoroughly in plastic wrap and aluminum foil and place in a cake tin or plastic bag. Brush the cake once or twice a week with brandy until ready to eat. This cake will keep several weeks or it can be frozen to keep longer.


Reference : Joy of Baking

Sugar Cookies

Sunday, December 20, 2009

Blue Sugar Cookies


Pink Sugar Cookies

We will be celebrating Christmas with a party this year. I had a very ambitious plan of preparing some homemade door gifts and googled for some interesting Christmas bakes.

As I tried out some of the recipes, I realized that time is not on my side and the thought of baking a few different offerings as door gifts for a hundred guests proved too daunting. So as a compromise, I decided to make just enough to be eaten at the party itself and gave up the idea of having them as door gifts.

This is one of the recipes that I had fun with – both because of the new experience of using royal icing (something I loved as a young girl) as well as the pretty colours.

Royal icing can be made using egg whites or meringue powder. Due to the risk of salmonella poisoning, I chose to use meringue powder instead. If you difficulty getting your hands on a can of meringue powder, you can search for a recipe using egg whites instead.

I had no idea of the huge variety of food colouring that was available till I stepped into Phoon Huat. There were bottles of liquid food colours, tubes of both white and coloured gel pastes. On top of that, there were the various sizes of icing nibs, squeeze bottles, icing bags and icing in ready-to-use disposable tubes.

It was really fun icing the cookies but if you plan not to frost the baked cookies, you may like to sprinkle the unbaked cookies with crystal or sparkling sugar before popping them into the oven.


Sugar Cookies


Ingredients

Sugar Cookie :
3½ cups (or 460 gm) all purpose flour
¼ tsp salt
1 tsp (or 4 gm) baking powder
1 cup (or 227 gm) unsalted butter, room temperature
1½ cups (or 300 gm) granulated white sugar
2 large eggs
2 tsp pure vanilla extract

Royal Icing :
1 cup (or 110 gm) confectioners' (powdered or icing) sugar, sifted
¾ tbsp (or 30 gm) meringue powder
Some warm water
Food Coloring
Hundreds and Thousands decoration


Method

Sugar Cookie :

1) In a separate bowl whisk together the flour, salt and baking powder. Set aside.

2) Beat butter and sugar until light and fluffy (about 3 to 4 minutes).

3) Add eggs and vanilla extract, and beat until combined. Add the flour mixture and beat until a smooth dough is formed.

4) Divide the dough into smaller portions, wrap each portion in plastic wrap and put into refrigerator. Refrigerate overnight or until firm enough to roll.

5) Preheat oven to 350 degrees F (or 170o C) and place rack in center of oven.

6) Remove one portion of chilled dough from the refrigerator. On a lightly floured surface, roll the dough to a thickness of ¼ inch (1 cm).

7) Cut out desired shapes using a lightly floured cookie cutter and transfer cookies to a baking tray, lined with baking sheet. Place the tray of unbaked cookies in the refrigerator for 15 min to chill the dough to prevent the cookies from spreading and losing their shape while baking.

8) Bake cookies for about 10 min (depending on size) or until they are brown around the edges. Remove from oven and leave to cool on baking tray for a few minutes before transferring to a wire rack to finish cooling.

9) When cookies are completed cool, frost with royal icing, if desired. Be sure to let the royal icing dry completely before storing in an airtight container between layers of parchment paper or wax paper.


Royal Icing :

1) Beat the confectioners' sugar and meringue powder until combined.

2) Add water a little at a time to get the right consistency and beat on medium to high speed until very glossy and stiff peaks form (5 to 7 minutes).

3) Separate the icing into as many portions as required for different colours and/or consistencies.

For out-lining, the proper consistency should be glossy with stiff peaks.

For covering or 'flooding' the entire surface of the cookie with icing, the proper consistency is when you lift the beater, the ribbon of icing that falls back into the bowl remains on the surface of the icing for a few seconds before disappearing.

4) Add food colouring to the royal icing to obtain desired colour. Use a toothpick and add minute amounts at a time, a little goes a long way.

6) After frosting, add further decorations if desired.

7) The icing needs to be used immediately or transferred to an airtight container as royal icing hardens when exposed to air. Cover with plastic wrap when not in use.


Reference : Joy of Baking

Restore Soft Biscuits to Crispy Ones

Thursday, December 17, 2009

Alas! The batch of cookies I made for a Christmas party this weekend had gone soft. I have been wondering how to restore their crispiness as a layer of royal icing on them complicates matters. Previous times, I just popped them into the oven for a couple of minutes and then let them cool on a wire rack. However, the royal icing on this batch of cookies makes this method unusable. It just will not do for the cookies to be crispy again only to end up with a messed-up blob of watery icing on its top.

So when I chanced upon this method, I was eager to give it a try and…it really works!

This method requires some care to calibrate the amount of microwave time required to warm the biscuits/crisps etc rather than overheat them, but once this has been established, the process is repeatable.

I am told that this same technique works for potato chips and other crispy snacks too. Do note that for items that have fillings or coatings that melt under high heat (such as chocolate or jam biscuits), take extra care to limit the heating such that it does not melt the filling/coating. Instead, more cycles of the process can be applied.


lllllllllllllllllllllllllllllllllllllll


Method

1. Get several cold ceramic dinner plates by putting them into the refrigerator for a couple of minutes.

2. Put a few of the soft biscuits on a plate and put it in the microwave oven. Give it a blast for just long enough to warm up the biscuits but not cook them.

3. Take the plate out of the oven and transfer the warmed biscuits onto a cold ceramic plate. What happens is the moisture in the biscuits evaporates without boiling and then condenses on the cold surface of the plate.

4. Transfer the biscuits onto another cold plate. Dry the first plate, and repeat the process a few times. After several cycles of the process, the biscuits will be dry and crispy.