Curry Puff

Saturday, October 31, 2009

Curry Puff

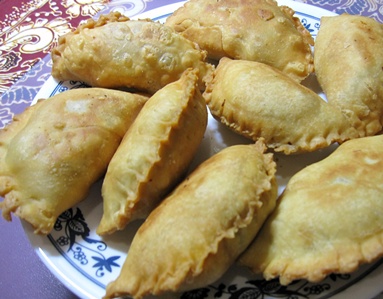
One lazy afternoon, Hubby made a request for some homemade curry puffs and that started the hunt for a recipe easy enough for me to follow.

We preferred our curry puffs with a thin crust and so I used dough rolled out to about a 0.3cm thickness. Instead of the measly filling most commercially-available curry puffs offer, I determined that each bite of my curry puff be bursting with flavourful potatoes and pieces of chicken and thus, a generous dollop of filling went into each curry puff.

Everyone agreed that the pastry was fantastic but the filling was not salty enough and that was when I realized I had forgotten to add the salt! Nevertheless, my dear supportive family and neighbours finished off all 23 curry puffs that night.

And you know what, my neighbour liked them so much that she requested me to teach her how to make them! K, that affirmation of yours made my day :)


Curry Puff


Ingredients

Filling:
1 big onion, chopped into small pieces
3 big potatoes, cut into cubes
350-400 gm chicken fillet, cut into cubes
10 tbsp of curry powder
4 hard boiled eggs, cut into eighths
some salt to taste

Pastry:
500 gm of plain flour
¾ cup of plain water
¾ cup of oil or 170 gm salted butter, melted
some salt to taste


Method

1. Boil cubed potatoes until cooked and soft. Remove from water and set aside.

2. Add flour, water and oil and knead together for 5-10 min. Let dough sit for 30 min.

3. Stir fry onions in some oil till soft.

4. Add chicken pieces and fry. Then add potatoes and fry.

5. Add curry powder and salt to above ingredients. Continue to fry till fragrant.

6. Add water until it almost covers the ingredients and fry till almost dry.

7. Roll dough to a thickness of about 0.5cm and place it over a curry puff mould. Put the fillings in the middle and clamp the mould shut to seal the edges. Remove excess dough from the edge of the mould. If you do not have a curry puff mould, you may cut the dough into circles and crimp the sides with your fingers.

8. Heat oil in wok and deep fry till golden brown.

9. Cool and serve.


Reference : Moms4Moms Forum

Nonya Kaya

Sunday, October 11, 2009

Nonya Kaya 1


Nonya Kaya

One day, out of the blue, my mother and I talked about how people make kaya. It seemed simple enough with only a few types of ingredients needed. I felt it would be an exciting and useful new recipe to try since our families enjoy kaya as a breakfast spread.

The amount of sugar that I have used is reduced as we prefer it to be less sweet but if you prefer yours a little sweeter, do add another ¼ - ½ cup more sugar.

You may also use more pandan leaves if you like kaya of a deeper green colour, I used 12 more pieces to arrive at the colour in my picture. Alternatively, you can also pound or blend a portion of the pandan leaves and strain it for pandan juice which can then be added to the mixture before cooking.

One important point to note is that if you are going to cook it over the stove, ensure that the pot is not warm nor hot when you place the ingredients in it to mix. If the pot is hot, the eggs would cook immediately and you will end up with pandan-and-coconut-milk-flavoured scrambled eggs.

This is the first time I am using this recipe and one thing I learnt was to add a little more sugar water while blending so that the kaya remains moist enough for easy spreading even after storing in the refrigerator. I removed most of the water and I found it fragrant though a little thick.

Hubby loves it so I will definitely be making it again and maybe…just maybe, my family will bid goodbye to store-bought ones.


Nonya Kaya


Ingredients

1 cup coconut milk
1 cup eggs
1 cup sugar
10-15 pieces of pandan leaves, washed and wiped dry

(This recipe makes roughly about 1½ cups of kaya)


Method

1. Wash, dry and tie up bundles of about 5 pandan leaves in each bundle.

2. Measure out eggs, then beat lightly till egg yolk and whites are mixed.

3. Put all ingredients into pot. Turn heat on at small and cook for about 1 hour, stirring continuously. The kaya mixture may look like a lumpy or curd-like substance.

4. Turn off heat and let mixture cool for a while. Remove all pandan leaves then put into a blender. There may be quite a bit of water (this is just sugar water) and if so, drain out some of this water. Blend lightly till smooth. Add more sugar water if kaya is too thick while blending.

5. Pour into jars and let cool before storing in refrigerator.


Reference : If she can do it, so can you

Lemon Cheesecake

Thursday, October 8, 2009

Lemon Cheesecake 1


Lemon Cheesecake 3

It has been a long while since I last made a cheesecake and to coincide with Hubby’s home-coming from a business trip, I tried out this recipe. I had previously made a non-bake version so this time, I wanted to try one that requires some baking time in the oven.

That first time, I made the cheesecake by hand-mixing as I had not gotten an electric mixer at that time. Perhaps I did not mix it sufficiently then as the cheesecake turned out slightly heavy. This time, the mixing process was a breeze with my electric mixer. Oh, the joys of modern appliances! However, lest I got too trigger-happy, I was warned not to over-mix for cheesecakes.

Too much air added to the mixture can lead to deep cracks in the top of the finished cake as the air bubbles expand during baking. Another reason for cracks, I learned, is a sudden and rapid change in temperature if the cake is baked at too high a heat or when the cake is cooled too quickly.

Even with this bit of information in mind, I think I must have over-mixed. Towards the end of the baking period, a small crack started to develop across one section of the cake top and when the cake was done, a deep crack was deeply etched on the cake’s surface. Thankfully though, with the help of some artfully-positioned fruits, it still looked presentable enough for tonight’s dessert.

Oh by the way, the recipe is good, the cheesecake was yummilicious :)


Lemon Cheesecake

Ingredients

200 gm digestive biscuits
100 gm butter
4 eggs
175 gm castor sugar
500 gm cream cheese
200gm sour cream
Rind of one lemon, finely grated
Juice of ½ lemon


Method

1. Pre-heat oven to 160oC.

2. Line base of a 20-cm diameter baking pan with baking paper.

3. Melt butter in a medium-sized pot.

4. Place biscuits in a bag and crush with a rolling pin.

5. Add crushed biscuits to melted butter and mix well. Press the mixture onto base of baking pan. Put the crust in the fridge as the filling is prepared.

6. Place eggs and sugar in a large bowl and beat until sugar is dissolved and mixture is creamy.

7. In a separate bowl, mix together cream cheese and sour cream with a wooden spoon until there are no lumps. Do not over-mix. Stir in the lemon juice and grated lemon rind. Combine with the cheese and egg mixture.

8. Remove crust from the fridge and pour in the combined mixture.

9. Bake in oven for 40-45 min.

10. Turn off heat and allow to cool in oven with door ajar. Refrigerate for at least a few hours before serving.

11. Either leave it plain or decorate the top with fruits.


Blueberry Topping

Ingredients

2 tbs sugar
¼ cup cold water
2 tsp cornflour
1 tbs lemon juice
200 gm blueberries


Method

1. Put sugar, water, cornflour and lemon juice in a small pot.

2. Heat, stir until thickened.

3. Add half the blueberries and continue to cook until soft. Allow to cool.

4. Arrange the remaining blueberries on top of the cake and spread the topping over. Refrigerate until ready to serve.


Reference : The Sunday Times, Lifestyle Section