

Every year, we buy a log cake as part of our family’s Christmas dinner spread. I personally do not enjoy most commercially prepared log cakes because I find it too creamy for my palate and sometimes, it even borders towards an oily feel to the cake.
This year, since we were going to have a non-Western dinner theme, I decided to throw tradition to the winds and just went ahead with a non Christmasy cake. Since we are all a little chocolate-mad, I decided to try a chocolate cake recipe and chanced upon this.
As I did not have all the required ingredients on hand, I substituted light muscovado sugar with just caster sugar and made my own buttermilk.
I also used strawberries to decorate the cake instead and found the tartness of the fruit offsets the sweetness of the cake well.
Ultimate Chocolate Cake
Ingredients
Cake :
200 gm good quality dark chocolate , about 60% cocoa solids
200 gm butter , cut in pieces
1 tbsp instant coffee granules
85 gm self-raising flour
85 gm plain flour
¼ tsp bicarbonate of soda
200 gm light muscovado sugar
200 gm golden caster sugar
25 gm cocoa powder
3 medium eggs
75 ml buttermilk (5 tbsp)
grated chocolate or curls, to decorate
Ganache :
200g good-quality dark chocolate , as above
284ml carton double cream (pouring type)
2 tbsp golden caster sugar
Buttermilk Substitute :
1 cup milk
1 tbsp vinegar or lemon juice
Add vinegar/lemon juice to milk and let stand for 10 min before using in recipe.
Method
1. Grease a 20cm round cake tin (7.5cm deep) and line the base.
2. Preheat the oven to fan 140C/conventional 160C/ gas 3.
3. Break the chocolate in pieces into a medium heavy-based pan and tip in the butter. Mix coffee granules into 125 ml cold water and pour into the pan. Warm over a low heat just until everything is melted – do not overheat.
4. While the chocolate is melting, mix the two flours, bicarbonate of soda, sugars and cocoa in a big bowl. Mix to get rid of any lumps.
5. Beat the eggs in a bowl and stir in the buttermilk.
6. Pour the melted chocolate mixture and the egg mixture into the flour mixture. Stir just until everything is well blended with a smooth, quite runny consistency. Pour into the baking tin.
7. Bake for 90 min or until a skewer inserted into the centre comes out clean. The top should feel firm, do not worry if it cracks a bit. Leave to cool in the tin (do not worry if it dips slightly), then turn out onto a wire rack to cool completely. When the cake is cold, cut it horizontally into three layers.
8. To make the ganache, chop the chocolate into small pieces and tip into a bowl.
9. Pour cream into a pan, add sugar and heat until it is about to boil. Remove pan from heat and pour it over the chocolate. Stir until the chocolate has melted and the mixture is smooth.
10. Sandwich the layers together with just a little of the ganache. Pour the rest over the cake letting it fall down the sides and smoothing to cover with a palette knife. Decorate with grated chocolate or a pile of chocolate curls.
Reference : BBC GoodFood
Ultimate Chocolate Cake
Wednesday, December 28, 2011Crispy Pork Belly
Saturday, December 25, 2010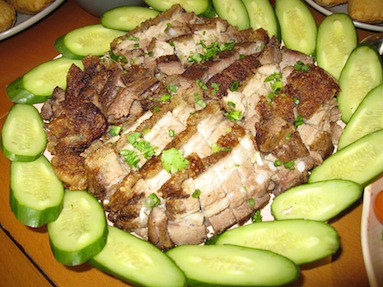
One of the most common dish at Christmas is the turkey but being in a Chinese family, it was never our tradition to celebrate Christmas with a turkey. And so tasked with a Christmas dinner to be prepared with the elder generation as guests, I decided to skip that celebrated bird altogether and go for a roast dish that is more Asian in nature and hopefully more palatable for my guests.
And was I glad to have made that decision. The Roast Pork Belly was welcomed by all and declared excellent by my family and relatives – a near-impossible feat as they are experienced cooks themselves.
To be honest, it was my maiden attempt doing it at home and without a proper oven to boot. The night before I was still poring over my microwave oven’s user manual, trying to figure out how to get to the roast function. The manual was too skimpy to be adequately helpful but the closest I could get to was to use the Combination 5 function which meant that the food would be cooked at the temperature closest to what the recipe called for. I knew it was going to be a huge gamble because there was no mention of what the Combination function actually does!
So I was really relieved when the Roast Pork Belly turned out beautifully and everyone had a good time feasting together.
Crispy Roast Pork Belly
Ingredients
1kg pork belly with skin on
1 tbsp salt
1 tbsp Chinese five spice powder
Some Popiah sweet sauce
Method
1. Fill a wok with enough water to submerge the pork belly and bring to a boil. When water is boiled, turn off heat and scald pork belly in wok for 15 min. (Parboiling the meat helps remove its odour) Remove the pork belly and discard water.
2. Place pork belly with meat on work surface and skin facing up. Stab skin vigorously with fork, leaving small gaps between punctures made to allow skim to blister nicely during roasting.
3. Rub salt and Chinese five spice powder all over the pork.
4. Preheat oven at maximum for 15 min. Place pork belly on roasting rack with skin facing upwards. Roast at 220 deg Celsius for 1 hour.
5. Remove from oven. Knock all over the skin with spoon. It is ready if it makes a sound like when a spoon is knocked against a hard surface. Otherwise, return to roast for 20-30 min or until skin is crispy.
6. Place pork belly on chopping board with skin facing down and cut to desired size.
7. Serve with drizzle of Popiah sweet sauce, if desired.
Reference : Care Cook Connect
Lemon Drizzle Cake
Tuesday, June 1, 2010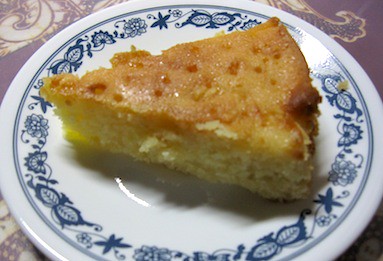
I love the tangy perk-me-up smell and taste of lemony cakes. I still remember the very first time I tried a lemon cake with poppy seeds at a local bakery. I loved it so much that I was devastated when they retired the recipe. Try I did, to find another bakery offering that same kind of delicious, tastebud tingling orange/lemon cakes, but I was sorely disappointed.
So imagine my excitement when I came across this recipe in The Sunday Times! It looked so simple that I had to give it a try and it turned out so good that I baked it several more times after that first attempt.
The original recipe calls for the zest of the lemon to be added to the creamed mixture. To be honest, I forgot to do that and ended with a ‘zest-less’ Lemon Drizzle Cake but since everyone commented how good it tasted, I decided to omit it completely when I baked it again. This is also partly because I personally find the zest of lemons and oranges bitter and I do not enjoy it. But should your tastebuds differ, you may add the zest of one lemon to the creamed mixture along with the ground almonds and lemon juice.
Lemon Drizzle Cake
Ingredients
Cake :
200 gm butter
200 gm castor sugar
3 eggs
150 gm plain flour
1 tsp baking powder
30 gm ground almond
Juice of 1 lemon
Drizzle Topping :
Juice of 1 lemon
60 gm castor sugar
Method
1. Pre-heat oven to 170 deg C.
2. Beat butter and sugar together until pale and creamy.
3. Beat eggs one by one into the creamed butter and sugar. Add a little flour if the mixture starts to curdle
4. Sift flour and baking powder together into a separate bowl. Stir into the creamed mixture, along with ground almond and lemon juice. The mixture should now be thick and creamy.
5. Grease the bottom and side of a 26cm diameter baking pan and line the bottom with baking paper. Spoon the mixture into the pan and smooth the top flat.
6. Bake in the pre-heated oven for about 35 min or until a skewer inserted into the cake comes out clean. The top should be light and springy when touched.
7. While the cake is baking, prepare the lemon drizzle by mixing the juice and sugar in a small bowl.
8. When the cake is taken out of the oven, prick small holes across the top with a bamboo skewer. Slowly pour the drizzle mixture across the entire surface.
9. Cut into wedges and serve on its own or with a scoop of ice-cream.
References : The Sunday Times, 2 May 2010
Chinese Glutinous Rice
Sunday, May 30, 2010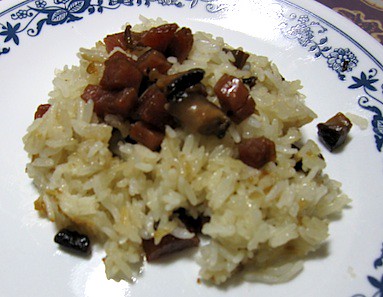
This recipe calls for white rice to be mixed with glutinous rice, resulting in a concoction with a softer bite that also does not give rise to a ‘bloated feeling’ after consumption – most welcomed by older folks who are prone to indigestion.
There are many variations to the recipe. You can also consider adding dried shrimp and garnish with pork/chicken floss before serving.
Chinese Glutinous Rice
Ingredients
1½ cups glutinous rice
½ cup white rice
3 Chinese sausages
8 dried mushrooms
½ yellow or white onion
2 stalks green onions
1 cup chicken broth or stock
1 tbsp rice wine
2 tsp soy sauce
1 tbsp oyster sauce
Method
1. Rinse the glutinous rice and soak it overnight in cold water. Do likewise for the dried mushrooms.
2. Chop the onion and green onion. Set the green onion aside in the fridge under a damp paper towel for garnish.
3. Remove the mushroom from the water but keep the soaking liquid. It will be used to cook the rice to infuse it with the mushroom flavor. Remove the mushroom stems and chop the mushrooms finely.
4. Slice the Chinese sausage into quarters lengthwise. Then chop those quarters into small pieces.
5. Heat a large frying pan or wok on medium-high until a drop of water sizzles. Combine the sausage, onion and mushrooms and place in the pan. Do not add extra oil because the sausage has plenty of fat to fry the mushrooms and onions. Add rice wine and stir-fry until the onions have turned golden brown, about 5 minutes. Add soy sauce and oyster sauce to the mixture. Be careful not to add too much, although at this point it will be excessively salty because it will also flavour the rice later. Stir fry till the onions have softened and that the sausage has browned nicely. Dish up the mixture and set aside.
6. Drain the rice and put into a medium to large pot with a lid. Pour in equal parts of the liquid used to soak the mushrooms and chicken broth. The liquid should just cover the rice. Cover the pot, keeping the lid to one side to let a small opening for steam to escape. Turn the heat to medium-low.
7. When the rice has absorbed some of the liquid, spoon the fried mixture over the rice. Do not stir or otherwise disturb the rice as it is will not be sufficiently cooked yet. Cover the pot and let it cook for an additional 10 minutes or so.
8. When the rice has finished cooking and absorbed all of the free-standing liquid, stir the rice to incorporate all the ingredients together. If necessary, add additional oyster sauce to taste.
9. Garnish with green onion and serve.
Reference : Destination Eats
Pineapple Tarts
Sunday, January 10, 2010
Two of my must-have Chinese New Year goodies are open-faced pineapple tarts and love letters. For as far back as I can remember, I have been getting my fix from the same stalls because so many have failed the test of my taste buds :)

This year, I decided to be a little more ambitious and make my own pineapple tarts. I have been told that the reason for their high price is its associated difficulty in making them and so, I decided to make a small batch in my first attempt…just in case…
I was heartened to discover that it was not too difficult really. That first batch also gave me plenty of opportunity to further refine the recipe for tarts better-suited to my family’s taste. The original recipe produced a batch of pineapple filling that gave too much of a sugar rush and I have reduced the amount of sugar as I used honey pineapples. I have also added some salt to the pastry to give a better taste.
Along the way, I have also picked up some useful tricks that made the process easier and I have included them in the revised recipe below. The pineapple filling can be made in advance and chilled. Should the pineapple filling become too sticky to roll between palms, pop it into the refrigerator for a couple of minutes to chill and harden slightly.
We love the homemade pineapple tarts and will be making more batches.
Pineapple Tarts
Ingredients
Pastry:
450 gm plain flour
50 gm milk powder
250 gm butter
1 egg, lightly beaten
2 tbsp iced water
a pinch of salt
a few drops yellow colouring (optional)
Filling:
4 cups lightly-blended pineapple (gently squeeze out some juice)
3 cups sugar
2 cloves
½ inch cinnamon stick
Method
Filling :
1. Place all ingredients into wok or heavy pan.
2. Cook for about 1- 1½ hour over medium heat, stirring occasionally till mixture turns thick and sticky. Allow to cool, then use a cling film to seal and chill in refrigerator.
Pastry :
3. Rub butter into flour and milk powder lightly with fingertips till mixture resembles breadcrumbs. Add beaten egg, water and colouring. Mix lightly, do not overmix.
4. Turn out onto lightly floured surface and roll out thinly (about 7mm thickness). Cut with round pastry cutter. Roll out remaining pastry and use a knife to cut into thin strips.
5. Roll a teaspoon of pineapple into a small ball. Flatten it slightly and place it in the centre of each pastry. Place the pastry strips over the tarts.
6. Bake in preheated oven 160oC for 10 min on middle rack. Remove the tray and glaze the tops of the tarts.
7. Rotate the tray and place it into oven and bake at 150oC for 10-15 min till light brown in colour.
8. Cool completely before storing in sealed container. If stacking tarts in layers, separate each layer with parchment paper.
Reference : Jthorge’s Kitchen
Book Review : Dead Heat
Friday, January 8, 2010
My delight was doubled when I picked up Dead Heat by Joel Rosenberg at the library. On first sight, I thought it would be another thriller action novel, along the likes of Dan Brown and James Rollins. The book is a page-turner with its suspense and playout of end-time prophecies.
From the time I had a taste of James Rollins and his mastery in incubating fact with fiction to hatch a fascinating tale of thrilling action, I got hooked onto this style of writing. And so, now Rosenberg presented me with another series of books written along a similar vein. I love how the authors threaded real fact with imagination to weave an almost credible story bordering on real-life investigative work. Some of the plots and subplots mentioned in their books bring a thrill along your spine as they hint of a sinister slant to real world events.
Dead Heat is a roller-coaster ride that had me gripping the political thriller till the end and then, left me rushing to get hold of its earlier prequels. It brings into play Biblical prophecies of the end-times (or eschatology) and shares bone-chilling insights to how it parallels with world happenings as they unfold. What is scarier is that, each of the 5 books in the series was written/published just before the major events mentioned in them happened in our world.
Verdict : 9/10. Two thumbs up!
Christmas is a time for family and friends
Tuesday, December 22, 2009Christmas features largely in our annual calendar of celebrations. For our family, it is a busy of the year as we gather at various weekend parties before Christmas.
This year, we decided to organize just one large combined Christmas party for our family and friends instead of segregating the group and having different parties over several days. Also, I felt motivated to add some personal touches to an otherwise outsourced party as we are engaging a caterer to handle the food arrangements for almost a hundred guests.
The Christmas party invites were handmade from cardstock sourced from the craft shop. I decided I did not want a cookie-cutter style and so each invitation card is unique, no two are the same. One side has a shiny-but-slightly-matt surface while the other side sported colourful borders.


For each table group, I made a Christmas Tree centre-piece to add a festive tinge to the room and as a tribute to the season. Chocolate hearts were scattered around its base to bring some colour to the table setting.

The sugar cookies I baked earlier were also left in plates on each table to serve as snacks for those with a penchant for sweet things. The kids loved them and I was so touched that several came up to say how much they liked the cookies.

This is the first time I baked for a large-scale occasion and I was so touched and encouraged when all the shepherd’s pie, fruitcake and brownie squares were polished off. Alas, Hubby and I were so caught up as hosts that we totally forgot to take pictures of the other food once our guests started arriving and we flitted from table to table, chatting and reveling in their company.

After dinner, the kids had fun with a piñata lovingly made by my mother. Using only natural materials, she lent her creative energy to fashion a striking piñata, heavily stuffed with goodies and little knickknacks. My mother truly has a way with kids as she organized the kids program that night and all of them, including the older children, had lots of fun.


It was a really wonderful evening spent with family and friends and a satisfying culmination of weeks’ of preparation, to finally know that it had been one great party.
Fruitcake
Monday, December 21, 2009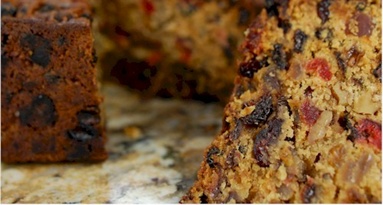
The really good chock-full-of-fruits-and-nuts kind of fruitcakes cost a fortune in shops. I love those with minimal flour but simply bursting with aged sultanas. My main gripe is that most fruitcakes sold out there are so much more flour than fruit that naming them fruitcakes is in itself a misnomer.
This year, I was determined to make some at home for Christmas this year. I tried and varied this recipe several times along the way, making adjustments to the balance of ingredients as well as baking time, till I settled on what my family feels is a good enough version.
This is one of the heaviest cake, in the literal sense, that I have baked thus far. More than one kilogram of ingredients have gone into the cake and I was glad I did not stinge. Each bite of the fruit cake yielded a mouthful of fruits and nuts.
Truly, may it herald a year of fruitfulness in 2010!
Fruitcake
Ingredients
200 gm unsalted butter
80 gm light brown sugar
80 gm dark brown sugar
2 large eggs
3 tbsp brandy
1 orange
zest (outer yellow skin) of one lemon
50 gm ground almonds
250 gm assortment of dried and candied fruits
500 gm dried raisins/sultanas
210 gm all-purpose flour
¾ tsp baking powder
¼ tsp salt
Method
1) Squeeze out juice of orange and finely grate the skin. Set aside in refrigerator.
2) Line and grease a 9 x 5 x 3 inch baking pan, extend about 2 inches above the pan. Preheat oven to 150oC.
3) Beat the butter and sugars until light and fluffy. Add eggs, one at a time, beating well after each addition. Scrape down the sides of the bowl as needed.
4) Add 2 tbsp of brandy and all the juice and orange and lemon zest. Fold in the ground almond and all the dried and candied fruits and raisins. In a separate bowl, whisk together the flour, salt and baking powder and fold this into the cake batter.
5) Scrape the batter into the prepared pan and bake in the preheated oven for 45 min.
6) Reduce the oven temperature to 140oC and continue to bake the cake for another 1½ hours or until a long skewer inserted into the center of the cake comes out with just a few moist crumbs.
7) Remove the cake from the oven and place on a wire rack to cool completely. With a skewer poke holes in the top surface of the cake and brush it with the remaining brandy .
8) Wrap the cake thoroughly in plastic wrap and aluminum foil and place in a cake tin or plastic bag. Brush the cake once or twice a week with brandy until ready to eat. This cake will keep several weeks or it can be frozen to keep longer.
Reference : Joy of Baking
Sugar Cookies
Sunday, December 20, 2009

We will be celebrating Christmas with a party this year. I had a very ambitious plan of preparing some homemade door gifts and googled for some interesting Christmas bakes.
As I tried out some of the recipes, I realized that time is not on my side and the thought of baking a few different offerings as door gifts for a hundred guests proved too daunting. So as a compromise, I decided to make just enough to be eaten at the party itself and gave up the idea of having them as door gifts.
This is one of the recipes that I had fun with – both because of the new experience of using royal icing (something I loved as a young girl) as well as the pretty colours.
Royal icing can be made using egg whites or meringue powder. Due to the risk of salmonella poisoning, I chose to use meringue powder instead. If you difficulty getting your hands on a can of meringue powder, you can search for a recipe using egg whites instead.
I had no idea of the huge variety of food colouring that was available till I stepped into Phoon Huat. There were bottles of liquid food colours, tubes of both white and coloured gel pastes. On top of that, there were the various sizes of icing nibs, squeeze bottles, icing bags and icing in ready-to-use disposable tubes.
It was really fun icing the cookies but if you plan not to frost the baked cookies, you may like to sprinkle the unbaked cookies with crystal or sparkling sugar before popping them into the oven.
Sugar Cookies
Ingredients
Sugar Cookie :
3½ cups (or 460 gm) all purpose flour
¼ tsp salt
1 tsp (or 4 gm) baking powder
1 cup (or 227 gm) unsalted butter, room temperature
1½ cups (or 300 gm) granulated white sugar
2 large eggs
2 tsp pure vanilla extract
Royal Icing :
1 cup (or 110 gm) confectioners' (powdered or icing) sugar, sifted
¾ tbsp (or 30 gm) meringue powder
Some warm water
Food Coloring
Hundreds and Thousands decoration
Method
Sugar Cookie :
1) In a separate bowl whisk together the flour, salt and baking powder. Set aside.
2) Beat butter and sugar until light and fluffy (about 3 to 4 minutes).
3) Add eggs and vanilla extract, and beat until combined. Add the flour mixture and beat until a smooth dough is formed.
4) Divide the dough into smaller portions, wrap each portion in plastic wrap and put into refrigerator. Refrigerate overnight or until firm enough to roll.
5) Preheat oven to 350 degrees F (or 170o C) and place rack in center of oven.
6) Remove one portion of chilled dough from the refrigerator. On a lightly floured surface, roll the dough to a thickness of ¼ inch (1 cm).
7) Cut out desired shapes using a lightly floured cookie cutter and transfer cookies to a baking tray, lined with baking sheet. Place the tray of unbaked cookies in the refrigerator for 15 min to chill the dough to prevent the cookies from spreading and losing their shape while baking.
8) Bake cookies for about 10 min (depending on size) or until they are brown around the edges. Remove from oven and leave to cool on baking tray for a few minutes before transferring to a wire rack to finish cooling.
9) When cookies are completed cool, frost with royal icing, if desired. Be sure to let the royal icing dry completely before storing in an airtight container between layers of parchment paper or wax paper.
Royal Icing :
1) Beat the confectioners' sugar and meringue powder until combined.
2) Add water a little at a time to get the right consistency and beat on medium to high speed until very glossy and stiff peaks form (5 to 7 minutes).
3) Separate the icing into as many portions as required for different colours and/or consistencies.
For out-lining, the proper consistency should be glossy with stiff peaks.
For covering or 'flooding' the entire surface of the cookie with icing, the proper consistency is when you lift the beater, the ribbon of icing that falls back into the bowl remains on the surface of the icing for a few seconds before disappearing.
4) Add food colouring to the royal icing to obtain desired colour. Use a toothpick and add minute amounts at a time, a little goes a long way.
6) After frosting, add further decorations if desired.
7) The icing needs to be used immediately or transferred to an airtight container as royal icing hardens when exposed to air. Cover with plastic wrap when not in use.
Reference : Joy of Baking
Fruit and Yoghurt Parfait
Monday, November 30, 2009
Recently, my brother and sister-in-law have both gone healthy and all in their eating habits. An answered prayer of my mother’s I must say. So in honour of their renewed decision for healthy living, this concoction is dedicated to them.

I have used kiwis, strawberries and mangoes for their mutually contrasting colours but the choice of fruits is of naturally not limited to these. However, in order for the different fruits to stand out, select fruits of different contrasting colours. The portions below are sufficient for 8 huge servings so do make adjustments as necessary.
Fruit and Yoghurt Parfait
Ingredients
4 green kiwis
12 red strawberries
2 ripe mangoes
1 huge tub plain yoghurt
Method
1) Wash and dice all fruits into cubes. Set aside.
2) Form a bottom layer with strawberries, put 3 tablespoons of yoghurt over them. Form the middle layer of kiwis followed with 3 tablespoons of yoghurt. Repeat for the top layer of mangoes.
3) Leave in refrigerator to chill before serving.
Sweet and Sour Pork
Saturday, November 28, 2009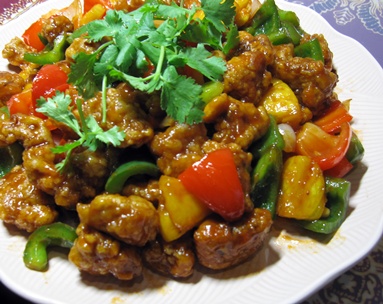
The past few weeks have been spent busy perfecting some Christmas recipes for cakes and cookies and other preparations for our Christmas parties. I had hardly any time left to spend experimenting new dishes for dinner.
My father loves sweet and sour pork and sometime ago, I had promised to cook that for him. So I guess, this long weekend was as good a time as any to make good on that promise.
I had noticed that NTUC Fairprice sells cubed pork sold in trays and neatly labeled as sweet and sour pork. And so for convenience, I decided to get this and since it was already all cut to size, I only had to trim off some fatty bits. (NTUC Fairprice has, in recent years, proven themselves to be widely-stocked with a wide-range of fresh produce. With a large branch located nearby, it has been a pretty useful place to run to for any item left out from the family’s weekly market trip.)
The pork cubes were prepared and left to marinate for 5 hours. Each bite yielded tender meat and most importantly, no ‘porky’ smell. We found the dish a little too sweet for our liking and so I have reflected a reduced amount of sugar in the reproduced recipe below. Other than that, the family gave it a thumbs up and every single morsel was polished off.
This recipe is a keeper!
Sweet and Sour Pork
Ingredients
500 gm lean pork (shoulder part), cut into cube-sized
1 green bell pepper, cut into small pieces
1 red bell pepper, cut into small pieces
3 wedges of honey pineapple, cut into small pieces
1 medium onion, cut into small pieces
2 cloves of garlic, chopped
Some cornflour
Marinate:
3 tbsp light soy sauce
1½ tsp of Hua Diao Jiu (花雕酒)
1 large egg
Sauce:
12 tbsp of tomato sauce
3 tbsp of sugar (reduced amount)
8 tbsp water
2 tsp of white vinegar
Pinch of salt
Method
1. Season pork cubes with light soy sauce and Hua Diao Jiu. Add in egg and combine well. Keep in the refrigerator and leave to marinate for at least 1 hour.
2. Add all sauce ingredients in a separate bowl. Stir to mix well and set aside.
3. When ready to cook, coat marinated pork cubes with cornflour. Make sure all sides of pork cubes are well covered with thick flour.
4. Heat wok with oil over high heat or use deep-fryer. Deep-fry pork for 5 min, or until crisp and golden brown. Remove from wok and drain on kitchen towel.
5. Clean wok. Heat wok with 1 teaspoon of oil, stir-fry chopped garlic till fragrant. Add bell peppers and pineapples, stir-fry for 3 min.
6. Return fried pork cubes to the wok and pour in sauce mixture. Stir-fry to combine well. Fry all ingredients briefly over high heat for 1 min and dish onto serving plate.
Reference : My Wok Life
Book Review : Fame
Saturday, November 7, 2009
Most people tend to view Christian literature as well…boring, dry and functions best as a sleep-inducing tool. Reading has always a favourite hobby of mine, as far back as I can remember, and I enjoy books of various genres. The one thing that I had always wondered is why there is an absence of books written for a widely secular audience but yet loaded with Christian values and presented in a manner that paints Christianity in a positive and appealing light. It would be a perfect way of sharing Christ and His values in a most non-threatening manner.
Over the years, I had concluded that it is probably a case of sensibility – dollars and cents just do not marry seemingly lofty heavenly morals. It would be hard to create a riveting storyline with God lurking between the lines, most people would have turned away. Thus, most Christian authors of secular fiction books will just mention God in their foreword or acknowledgment page.
Imagine my delight when I found Karen Kingsbury’s series of books. If you have not read any of her books, you would have missed out on powerful stories beautifully crafted to illustrate God’s blessings and ways in the lives of ordinary families and people. It is totally refreshing to see how ordinary people struggle with and live out kingdom values. Her stories touch on themes of love, loss, death, forgiveness, fame, acceptance, loyalty, trust, etc. Kingsbury effectively portrays Christianity not as a religion but for what it is – real relationship with God.
God comes through so strongly through her books that as I followed the story, I found myself tearing at times and stopping now and then to pray for myself or my family. You know it is a good Christian book when you feel motivated to do something for God. But you know it is a fantastic Christian book when you are compelled to immediately stop reading to respond to the message God is bringing you through the book. And only after you have responded then you are able to pick the book up to continue reading.
God bless Kingsbury for being a literary agent of God’s message to the world. She is also involved in various ministries ministering to different groups!
Verdict : 10/10. I love all her books!
Curry Puff
Saturday, October 31, 2009
One lazy afternoon, Hubby made a request for some homemade curry puffs and that started the hunt for a recipe easy enough for me to follow.
We preferred our curry puffs with a thin crust and so I used dough rolled out to about a 0.3cm thickness. Instead of the measly filling most commercially-available curry puffs offer, I determined that each bite of my curry puff be bursting with flavourful potatoes and pieces of chicken and thus, a generous dollop of filling went into each curry puff.
Everyone agreed that the pastry was fantastic but the filling was not salty enough and that was when I realized I had forgotten to add the salt! Nevertheless, my dear supportive family and neighbours finished off all 23 curry puffs that night.
And you know what, my neighbour liked them so much that she requested me to teach her how to make them! K, that affirmation of yours made my day :)
Curry Puff
Ingredients
Filling:
1 big onion, chopped into small pieces
3 big potatoes, cut into cubes
350-400 gm chicken fillet, cut into cubes
10 tbsp of curry powder
4 hard boiled eggs, cut into eighths
some salt to taste
Pastry:
500 gm of plain flour
¾ cup of plain water
¾ cup of oil or 170 gm salted butter, melted
some salt to taste
Method
1. Boil cubed potatoes until cooked and soft. Remove from water and set aside.
2. Add flour, water and oil and knead together for 5-10 min. Let dough sit for 30 min.
3. Stir fry onions in some oil till soft.
4. Add chicken pieces and fry. Then add potatoes and fry.
5. Add curry powder and salt to above ingredients. Continue to fry till fragrant.
6. Add water until it almost covers the ingredients and fry till almost dry.
7. Roll dough to a thickness of about 0.5cm and place it over a curry puff mould. Put the fillings in the middle and clamp the mould shut to seal the edges. Remove excess dough from the edge of the mould. If you do not have a curry puff mould, you may cut the dough into circles and crimp the sides with your fingers.
8. Heat oil in wok and deep fry till golden brown.
9. Cool and serve.
Reference : Moms4Moms Forum
Nonya Kaya
Sunday, October 11, 2009
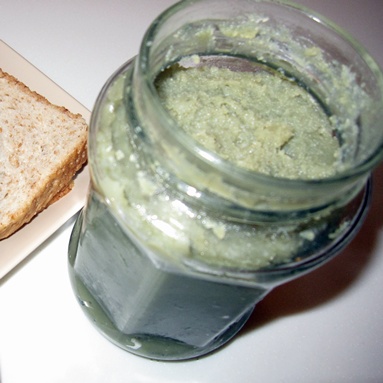
One day, out of the blue, my mother and I talked about how people make kaya. It seemed simple enough with only a few types of ingredients needed. I felt it would be an exciting and useful new recipe to try since our families enjoy kaya as a breakfast spread.
The amount of sugar that I have used is reduced as we prefer it to be less sweet but if you prefer yours a little sweeter, do add another ¼ - ½ cup more sugar.
You may also use more pandan leaves if you like kaya of a deeper green colour, I used 12 more pieces to arrive at the colour in my picture. Alternatively, you can also pound or blend a portion of the pandan leaves and strain it for pandan juice which can then be added to the mixture before cooking.
One important point to note is that if you are going to cook it over the stove, ensure that the pot is not warm nor hot when you place the ingredients in it to mix. If the pot is hot, the eggs would cook immediately and you will end up with pandan-and-coconut-milk-flavoured scrambled eggs.
This is the first time I am using this recipe and one thing I learnt was to add a little more sugar water while blending so that the kaya remains moist enough for easy spreading even after storing in the refrigerator. I removed most of the water and I found it fragrant though a little thick.
Hubby loves it so I will definitely be making it again and maybe…just maybe, my family will bid goodbye to store-bought ones.
Nonya Kaya
Ingredients
1 cup coconut milk
1 cup eggs
1 cup sugar
10-15 pieces of pandan leaves, washed and wiped dry
(This recipe makes roughly about 1½ cups of kaya)
Method
1. Wash, dry and tie up bundles of about 5 pandan leaves in each bundle.
2. Measure out eggs, then beat lightly till egg yolk and whites are mixed.
3. Put all ingredients into pot. Turn heat on at small and cook for about 1 hour, stirring continuously. The kaya mixture may look like a lumpy or curd-like substance.
4. Turn off heat and let mixture cool for a while. Remove all pandan leaves then put into a blender. There may be quite a bit of water (this is just sugar water) and if so, drain out some of this water. Blend lightly till smooth. Add more sugar water if kaya is too thick while blending.
5. Pour into jars and let cool before storing in refrigerator.
Reference : If she can do it, so can you
Lemon Cheesecake
Thursday, October 8, 2009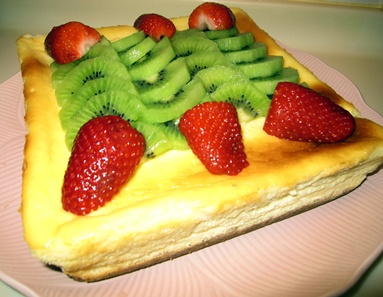

It has been a long while since I last made a cheesecake and to coincide with Hubby’s home-coming from a business trip, I tried out this recipe. I had previously made a non-bake version so this time, I wanted to try one that requires some baking time in the oven.
That first time, I made the cheesecake by hand-mixing as I had not gotten an electric mixer at that time. Perhaps I did not mix it sufficiently then as the cheesecake turned out slightly heavy. This time, the mixing process was a breeze with my electric mixer. Oh, the joys of modern appliances! However, lest I got too trigger-happy, I was warned not to over-mix for cheesecakes.
Too much air added to the mixture can lead to deep cracks in the top of the finished cake as the air bubbles expand during baking. Another reason for cracks, I learned, is a sudden and rapid change in temperature if the cake is baked at too high a heat or when the cake is cooled too quickly.
Even with this bit of information in mind, I think I must have over-mixed. Towards the end of the baking period, a small crack started to develop across one section of the cake top and when the cake was done, a deep crack was deeply etched on the cake’s surface. Thankfully though, with the help of some artfully-positioned fruits, it still looked presentable enough for tonight’s dessert.
Oh by the way, the recipe is good, the cheesecake was yummilicious :)
Lemon Cheesecake
Ingredients
200 gm digestive biscuits
100 gm butter
4 eggs
175 gm castor sugar
500 gm cream cheese
200gm sour cream
Rind of one lemon, finely grated
Juice of ½ lemon
Method
1. Pre-heat oven to 160oC.
2. Line base of a 20-cm diameter baking pan with baking paper.
3. Melt butter in a medium-sized pot.
4. Place biscuits in a bag and crush with a rolling pin.
5. Add crushed biscuits to melted butter and mix well. Press the mixture onto base of baking pan. Put the crust in the fridge as the filling is prepared.
6. Place eggs and sugar in a large bowl and beat until sugar is dissolved and mixture is creamy.
7. In a separate bowl, mix together cream cheese and sour cream with a wooden spoon until there are no lumps. Do not over-mix. Stir in the lemon juice and grated lemon rind. Combine with the cheese and egg mixture.
8. Remove crust from the fridge and pour in the combined mixture.
9. Bake in oven for 40-45 min.
10. Turn off heat and allow to cool in oven with door ajar. Refrigerate for at least a few hours before serving.
11. Either leave it plain or decorate the top with fruits.
Blueberry Topping
Ingredients
2 tbs sugar
¼ cup cold water
2 tsp cornflour
1 tbs lemon juice
200 gm blueberries
Method
1. Put sugar, water, cornflour and lemon juice in a small pot.
2. Heat, stir until thickened.
3. Add half the blueberries and continue to cook until soft. Allow to cool.
4. Arrange the remaining blueberries on top of the cake and spread the topping over. Refrigerate until ready to serve.
Reference : The Sunday Times, Lifestyle Section
Toot toot time
Wednesday, September 23, 2009
Many mothers confess that after the huge investment of time and effort on their firstborn, the same cannot be said of the attention given to their subsequent offspring. I admit that I am guilty of it too.
On the other hand, because of the experience gained in teaching Big Buddy, I have also discovered that I am more effective in guiding my younger one and bolder in leading him to explore areas and concepts that are traditionally reserved for older children. Do not get me wrong, this is not a case of kiasu-ism at work. I do not push my kids unnecessarily and certainly never beyond their interest and capability.
After recognizing both upper and lower case letters of the alphabet and numbers 1-10, Little Buddy breezed through writing them and has mastered writing them from memory. Over a span of 7 months, since I started Little Buddy on written work, he is now able to write his English name, read some English and Chinese words, draw expressively and converse intelligently with a wide vocabulary. He handles writing and drawing instruments well with a firm and confident grip and turns book pages without creasing them.
On life skills, he has been able to use the toilet, remove and wear his trousers and briefs and flush the toilet without help. He can self-feed if he so desires and is able to communicate his needs and wants more than adequately to people around him. He displays a self-confidence way past his 3 years, pooh-poohs babyish games and often prefers older play mates who play more interesting and rowdy games.
He has a strong character with definite likes and dislikes which he does not hesitate to let known. He is strong-willed with firm opinions that are difficult to sway.
Much of Little Buddy’s development has been self-driven as he constantly shows interest in what his brother does, often emulating him in speech and actions too. His progress too has been helped by an exceptional memory, he remembers very well things that were said, taught or done just once.
As I grow along with Little Buddy, I have been pleasantly surprised and secretly proud of his achievements. While he is strong in character and not easy to teach and guide, I rejoice at his well-rounded mental, physical and character development.
Floating Lotus
Saturday, September 19, 2009
Over the past two months, I had been in the kitchen occasionally, baking brownies as gifts for friends and cooking some simple dishes. However, it has been quite a long while since I last whipped up something new and my fingers are starting to itch again.
The thought of making something Thai is tempting but nothing too exotic as I am but an amateur in the kitchen still. This recipe seems simple enough and the ingredients called for are easily available.
It tastes a little like Bubur Cha Cha and it brought back nostalgic memories of the time I made that sweet dessert in Home Economics class during my secondary school days. In those days, my class usually treated these lessons with little seriousness, indulging instead in much chatter and laughter as skills like cooking and sewing were the least on our young minds then.
Little did I know then, that I would one day willingly step into the kitchen to cook for my family with such positive anticipation and joy…
Floating Lotus
Ingredients
½ cup thai pumpkin
½ cup taro (yam)
1 cup sticky rice flour
½ cup coconut milk (use only the cream if using fresh)
¾ tsp salt
2 cups pandan-infused water
1/3 cup white sugar
Method
1. Steam the pumpkin and taro until soft, between 10-15 min.
2. Mash the pumpkin, then mix equal parts pumpkin and sticky rice flour together until a uniform paste. Do the same to the taro (separately).
3. Roll into small ¼ ″ – ½ ″ balls and set aside.
4. Boil the balls in hot water until they float. Remove with a slotted spoon and put into a bath of room temperature water.
5. Boil the coconut milk with the water, sugar and salt. Add the balls and serve.
Reference : Real Thai Recipes
Up up and away
Wednesday, August 5, 2009Last Sunday was Hubby’s Company Family Day and they organized a private viewing of UP at the cinema. There were lots of other kids and it was great fun meeting other families. We were given vouchers redeemable for snacks at the snack bar and we came away with bag loads of hotdog buns, popcorn, nachos and drinks. To top it all, there was a mini lucky draw just before the movie screening and we were pleasantly surprised to discover that our family won a prize.
UP is a stereoscopic 3D movie, requiring specially provided glasses in order to view the 3D effects. It was great fun with the kids reaching out to grab at things that appear to pop-out at them. But yet I wished those glasses came in smaller sizes for the kids as Little Buddy had his adult-sized one falling off his nose.
The movie had a story-line with much more depth than the cute characters and graphics. It explores themes of love, adventure, loyalty and honour, issues associated with aging, making choices and dreaming new dreams with cursory light mention of childless marriage, absent parenting – some in greater depth than others. The emotional aspect was so well portrayed that even Big Buddy caught the nuances and could empathise with the characters at critical moments. It is a wonderful journey of sorts, whimsical and yet poignant.
UP is a fantastic showcase of how far Pixar has advanced over the years. I love their subtle portrayal of unlikely themes and the clever presentation of subjects that may still appeal to the thinking adult.
Go watch it if you can!
Mango with Sticky Rice
Wednesday, July 22, 2009
Every time we visit Thailand, we will definitely seek out this popular Thai dessert. It is so much cheaper and tastier than the versions found back here in Singapore. The sweetness of the mango goes so well with the fragrance of the coconut milk in the warm and slightly-salted sticky rice.
Sweet ripe mangoes are a key ingredient for this dessert and I had a hard time finding them. They were everywhere just a couple of weeks ago but now, just as they were in abundance then, they are a scarcity now. The recent few that I bought 2 weeks back were sour. To make this dish, I scoured the market stalls till I saw some huge Taiwanese ones. Thankfully, they were delightfully sweet.
A last thing to note : if you do not intend to consume this immediately, please remember not to refrigerate it. It will turn into a rock-hard sticky mess – something you definitely will not want to sink your teeth into!
Mango with Sticky Rice
Ingredients
½ cup raw glutinous rice
¼ tsp toasted sesame seeds or salted fried mung beans (optional)
1 sweet, ripe yellow mango
Sauce for rice :
½ cup coconut milk
¼ tsp salt
1 1/3 tbsp white sugar
Sauce for topping :
¼ cup coconut milk
1/8 tsp salt
1½ tsp white sugar
½ tsp tapioca starch (optional)
Method
1. Soak the sticky rice for at least an hour before steaming.
2. Steam for 20 minutes on medium-high in a sticky rice steamer or in a bowl placed in a covered saucepan with an inch of water at the bottom of the pan.
3. While steaming, prepare the sauce for the rice. Add the ½ cup of coconut milk to a saucepan along with the 1 1/3 tablespoons sugar & ¼ teaspoon salt, and stir over low heat until dissolved. Set aside.
4. Prepare the topping sauce as well. In another small saucepan, add ¼ cup coconut milk, 1½ teaspoons sugar, and 1/8 teaspoon salt, and stir over low heat until dissolved. Mix the tapioca starch with a little bit of water in a small bowl until a paste, then add as well. Mixing the starch beforehand will prevent any lumps from forming in the sauce. Stir until thickened, and remove from heat.
5. When the rice is cooked, spread out in a shallow bowl and cover with ½ the sauce meant for the rice. Stir well and keep adding more until saturation point is reached – which is usually just before puddles of coconut milk are seen. Stir well and cover with a towel. Let the rice absorb the coconut milk for 10-15 minutes.
6. Slice mango as shown and arrange on a plate. Spoon an equal amount of sticky rice next to it, and top with a few spoons of the thicker sauce. Garnish with toasted sesame seeds or fried salty mung beans.
Reference : Real Thai Recipes
Silky Girl Funky Eyelights Pencil
Tuesday, July 21, 2009
The last time I tried a pencil eyeliner was almost a decade ago. The experience put me off pencil liners for good as it was messy with powder fallout. To seal it off, within a couple of hours, the smudge was so bad that I looked like a panda with punched eyes.
Only in recent months after seeing smudge-proof versions in candy colours, did I contemplate revisiting pencil eyeliners. So on a whim, I bought one from Silky Girl since it was on discount at Watson’s. It was so cheap that I thought I could just throw it away with no heartache if it disappoints again.
I had my first opportunity to use my new Silky Girl Funky Eyelights Pencil in Metallic Bronze last Saturday. It was on smoothly enough without tugging although I did not use an eye primer. The colour was too sheer with just one application so I went over twice till I liked what I saw. But I wager one application will be fine for daily light make-up. There was no smudge even after four hours but for all its staying power, it was easily removed with eye makeup remover at the end of the day.
I like that application is such a breeze and it being affordable adds to the overall positive experience. The other colour I was eyeing was the Olive Green one, so now I may just go get it.

