Christmas is a time for family and friends

Tuesday, December 22, 2009

Christmas features largely in our annual calendar of celebrations. For our family, it is a busy of the year as we gather at various weekend parties before Christmas.

This year, we decided to organize just one large combined Christmas party for our family and friends instead of segregating the group and having different parties over several days. Also, I felt motivated to add some personal touches to an otherwise outsourced party as we are engaging a caterer to handle the food arrangements for almost a hundred guests.

The Christmas party invites were handmade from cardstock sourced from the craft shop. I decided I did not want a cookie-cutter style and so each invitation card is unique, no two are the same. One side has a shiny-but-slightly-matt surface while the other side sported colourful borders.


Christmas Party Invitation Front


Christmas Party Invitation Back


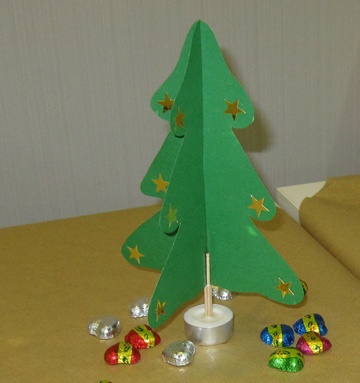
For each table group, I made a Christmas Tree centre-piece to add a festive tinge to the room and as a tribute to the season. Chocolate hearts were scattered around its base to bring some colour to the table setting.


Christmas Tree Gold


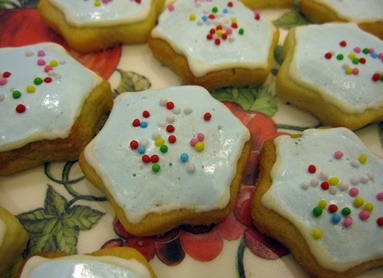
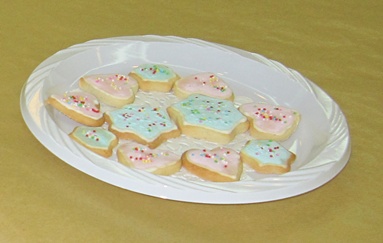
The sugar cookies I baked earlier were also left in plates on each table to serve as snacks for those with a penchant for sweet things. The kids loved them and I was so touched that several came up to say how much they liked the cookies.


Sugar Cookies Plate


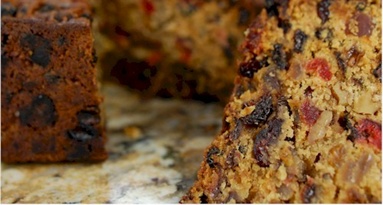
This is the first time I baked for a large-scale occasion and I was so touched and encouraged when all the shepherd’s pie, fruitcake and brownie squares were polished off. Alas, Hubby and I were so caught up as hosts that we totally forgot to take pictures of the other food once our guests started arriving and we flitted from table to table, chatting and reveling in their company.


Sidetable of Cakes and Pastries


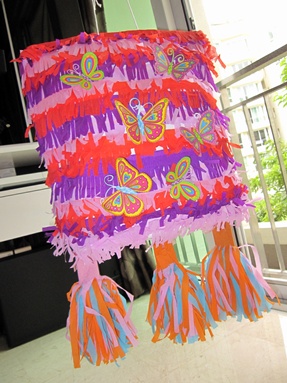
After dinner, the kids had fun with a piñata lovingly made by my mother. Using only natural materials, she lent her creative energy to fashion a striking piñata, heavily stuffed with goodies and little knickknacks. My mother truly has a way with kids as she organized the kids program that night and all of them, including the older children, had lots of fun.


Pinata Butterfly


Pinata Fish


It was a really wonderful evening spent with family and friends and a satisfying culmination of weeks’ of preparation, to finally know that it had been one great party.

Fruitcake

Monday, December 21, 2009

Fruitcake

The really good chock-full-of-fruits-and-nuts kind of fruitcakes cost a fortune in shops. I love those with minimal flour but simply bursting with aged sultanas. My main gripe is that most fruitcakes sold out there are so much more flour than fruit that naming them fruitcakes is in itself a misnomer.

This year, I was determined to make some at home for Christmas this year. I tried and varied this recipe several times along the way, making adjustments to the balance of ingredients as well as baking time, till I settled on what my family feels is a good enough version.

This is one of the heaviest cake, in the literal sense, that I have baked thus far. More than one kilogram of ingredients have gone into the cake and I was glad I did not stinge. Each bite of the fruit cake yielded a mouthful of fruits and nuts.

Truly, may it herald a year of fruitfulness in 2010!


Fruitcake


Ingredients

200 gm unsalted butter
80 gm light brown sugar
80 gm dark brown sugar
2 large eggs
3 tbsp brandy
1 orange
zest (outer yellow skin) of one lemon
50 gm ground almonds
250 gm assortment of dried and candied fruits
500 gm dried raisins/sultanas
210 gm all-purpose flour
¾ tsp baking powder
¼ tsp salt


Method

1) Squeeze out juice of orange and finely grate the skin. Set aside in refrigerator.

2) Line and grease a 9 x 5 x 3 inch baking pan, extend about 2 inches above the pan. Preheat oven to 150oC.

3) Beat the butter and sugars until light and fluffy. Add eggs, one at a time, beating well after each addition. Scrape down the sides of the bowl as needed.

4) Add 2 tbsp of brandy and all the juice and orange and lemon zest. Fold in the ground almond and all the dried and candied fruits and raisins. In a separate bowl, whisk together the flour, salt and baking powder and fold this into the cake batter.

5) Scrape the batter into the prepared pan and bake in the preheated oven for 45 min.

6) Reduce the
oven temperature to 140oC and continue to bake the cake for another 1½ hours or until a long skewer inserted into the center of the cake comes out with just a few moist crumbs.

7) Remove the cake from the oven and place on a wire rack to cool completely. With a skewer poke holes in the top surface of the cake and brush it with the remaining brandy .

8) Wrap the cake thoroughly in plastic wrap and aluminum foil and place in a cake tin or plastic bag. Brush the cake once or twice a week with brandy until ready to eat. This cake will keep several weeks or it can be frozen to keep longer.


Reference : Joy of Baking

Sugar Cookies

Sunday, December 20, 2009

Blue Sugar Cookies


Pink Sugar Cookies

We will be celebrating Christmas with a party this year. I had a very ambitious plan of preparing some homemade door gifts and googled for some interesting Christmas bakes.

As I tried out some of the recipes, I realized that time is not on my side and the thought of baking a few different offerings as door gifts for a hundred guests proved too daunting. So as a compromise, I decided to make just enough to be eaten at the party itself and gave up the idea of having them as door gifts.

This is one of the recipes that I had fun with – both because of the new experience of using royal icing (something I loved as a young girl) as well as the pretty colours.

Royal icing can be made using egg whites or meringue powder. Due to the risk of salmonella poisoning, I chose to use meringue powder instead. If you difficulty getting your hands on a can of meringue powder, you can search for a recipe using egg whites instead.

I had no idea of the huge variety of food colouring that was available till I stepped into Phoon Huat. There were bottles of liquid food colours, tubes of both white and coloured gel pastes. On top of that, there were the various sizes of icing nibs, squeeze bottles, icing bags and icing in ready-to-use disposable tubes.

It was really fun icing the cookies but if you plan not to frost the baked cookies, you may like to sprinkle the unbaked cookies with crystal or sparkling sugar before popping them into the oven.


Sugar Cookies


Ingredients

Sugar Cookie :
3½ cups (or 460 gm) all purpose flour
¼ tsp salt
1 tsp (or 4 gm) baking powder
1 cup (or 227 gm) unsalted butter, room temperature
1½ cups (or 300 gm) granulated white sugar
2 large eggs
2 tsp pure vanilla extract

Royal Icing :
1 cup (or 110 gm) confectioners' (powdered or icing) sugar, sifted
¾ tbsp (or 30 gm) meringue powder
Some warm water
Food Coloring
Hundreds and Thousands decoration


Method

Sugar Cookie :

1) In a separate bowl whisk together the flour, salt and baking powder. Set aside.

2) Beat butter and sugar until light and fluffy (about 3 to 4 minutes).

3) Add eggs and vanilla extract, and beat until combined. Add the flour mixture and beat until a smooth dough is formed.

4) Divide the dough into smaller portions, wrap each portion in plastic wrap and put into refrigerator. Refrigerate overnight or until firm enough to roll.

5) Preheat oven to 350 degrees F (or 170o C) and place rack in center of oven.

6) Remove one portion of chilled dough from the refrigerator. On a lightly floured surface, roll the dough to a thickness of ¼ inch (1 cm).

7) Cut out desired shapes using a lightly floured cookie cutter and transfer cookies to a baking tray, lined with baking sheet. Place the tray of unbaked cookies in the refrigerator for 15 min to chill the dough to prevent the cookies from spreading and losing their shape while baking.

8) Bake cookies for about 10 min (depending on size) or until they are brown around the edges. Remove from oven and leave to cool on baking tray for a few minutes before transferring to a wire rack to finish cooling.

9) When cookies are completed cool, frost with royal icing, if desired. Be sure to let the royal icing dry completely before storing in an airtight container between layers of parchment paper or wax paper.


Royal Icing :

1) Beat the confectioners' sugar and meringue powder until combined.

2) Add water a little at a time to get the right consistency and beat on medium to high speed until very glossy and stiff peaks form (5 to 7 minutes).

3) Separate the icing into as many portions as required for different colours and/or consistencies.

For out-lining, the proper consistency should be glossy with stiff peaks.

For covering or 'flooding' the entire surface of the cookie with icing, the proper consistency is when you lift the beater, the ribbon of icing that falls back into the bowl remains on the surface of the icing for a few seconds before disappearing.

4) Add food colouring to the royal icing to obtain desired colour. Use a toothpick and add minute amounts at a time, a little goes a long way.

6) After frosting, add further decorations if desired.

7) The icing needs to be used immediately or transferred to an airtight container as royal icing hardens when exposed to air. Cover with plastic wrap when not in use.


Reference : Joy of Baking

Restore Soft Biscuits to Crispy Ones

Thursday, December 17, 2009

Alas! The batch of cookies I made for a Christmas party this weekend had gone soft. I have been wondering how to restore their crispiness as a layer of royal icing on them complicates matters. Previous times, I just popped them into the oven for a couple of minutes and then let them cool on a wire rack. However, the royal icing on this batch of cookies makes this method unusable. It just will not do for the cookies to be crispy again only to end up with a messed-up blob of watery icing on its top.

So when I chanced upon this method, I was eager to give it a try and…it really works!

This method requires some care to calibrate the amount of microwave time required to warm the biscuits/crisps etc rather than overheat them, but once this has been established, the process is repeatable.

I am told that this same technique works for potato chips and other crispy snacks too. Do note that for items that have fillings or coatings that melt under high heat (such as chocolate or jam biscuits), take extra care to limit the heating such that it does not melt the filling/coating. Instead, more cycles of the process can be applied.


lllllllllllllllllllllllllllllllllllllll


Method

1. Get several cold ceramic dinner plates by putting them into the refrigerator for a couple of minutes.

2. Put a few of the soft biscuits on a plate and put it in the microwave oven. Give it a blast for just long enough to warm up the biscuits but not cook them.

3. Take the plate out of the oven and transfer the warmed biscuits onto a cold ceramic plate. What happens is the moisture in the biscuits evaporates without boiling and then condenses on the cold surface of the plate.

4. Transfer the biscuits onto another cold plate. Dry the first plate, and repeat the process a few times. After several cycles of the process, the biscuits will be dry and crispy.