Crispy Pork Belly

Saturday, December 25, 2010

Crispy Roast Pork Belly

One of the most common dish at Christmas is the turkey but being in a Chinese family, it was never our tradition to celebrate Christmas with a turkey. And so tasked with a Christmas dinner to be prepared with the elder generation as guests, I decided to skip that celebrated bird altogether and go for a roast dish that is more Asian in nature and hopefully more palatable for my guests.

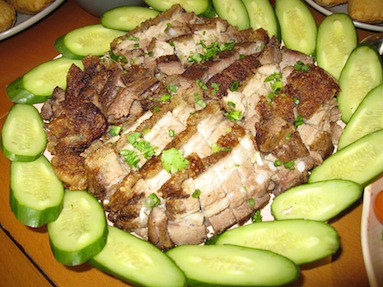
And was I glad to have made that decision. The Roast Pork Belly was welcomed by all and declared excellent by my family and relatives – a near-impossible feat as they are experienced cooks themselves.

To be honest, it was my maiden attempt doing it at home and without a proper oven to boot. The night before I was still poring over my microwave oven’s user manual, trying to figure out how to get to the roast function. The manual was too skimpy to be adequately helpful but the closest I could get to was to use the Combination 5 function which meant that the food would be cooked at the temperature closest to what the recipe called for. I knew it was going to be a huge gamble because there was no mention of what the Combination function actually does!

So I was really relieved when the Roast Pork Belly turned out beautifully and everyone had a good time feasting together.


Crispy Roast Pork Belly


Ingredients

1kg pork belly with skin on
1 tbsp salt
1 tbsp Chinese five spice powder
Some Popiah sweet sauce


Method

1. Fill a wok with enough water to submerge the pork belly and bring to a boil. When water is boiled, turn off heat and scald pork belly in wok for 15 min. (Parboiling the meat helps remove its odour) Remove the pork belly and discard water.

2. Place pork belly with meat on work surface and skin facing up. Stab skin vigorously with fork, leaving small gaps between punctures made to allow skim to blister nicely during roasting.

3. Rub salt and Chinese five spice powder all over the pork.

4. Preheat oven at maximum for 15 min. Place pork belly on roasting rack with skin facing upwards. Roast at 220 deg Celsius for 1 hour.

5. Remove from oven. Knock all over the skin with spoon. It is ready if it makes a sound like when a spoon is knocked against a hard surface. Otherwise, return to roast for 20-30 min or until skin is crispy.

6. Place pork belly on chopping board with skin facing down and cut to desired size.

7. Serve with drizzle of Popiah sweet sauce, if desired.


Reference : Care Cook Connect

Lemon Drizzle Cake

Tuesday, June 1, 2010

Lemon Dizzle Cake

I love the tangy perk-me-up smell and taste of lemony cakes. I still remember the very first time I tried a lemon cake with poppy seeds at a local bakery. I loved it so much that I was devastated when they retired the recipe. Try I did, to find another bakery offering that same kind of delicious, tastebud tingling orange/lemon cakes, but I was sorely disappointed.

So imagine my excitement when I came across this recipe in The Sunday Times! It looked so simple that I had to give it a try and it turned out so good that I baked it several more times after that first attempt.

The original recipe calls for the zest of the lemon to be added to the creamed mixture. To be honest, I forgot to do that and ended with a ‘zest-less’ Lemon Drizzle Cake but since everyone commented how good it tasted, I decided to omit it completely when I baked it again. This is also partly because I personally find the zest of lemons and oranges bitter and I do not enjoy it. But should your tastebuds differ, you may add the zest of one lemon to the creamed mixture along with the ground almonds and lemon juice.


Lemon Drizzle Cake


Ingredients

Cake :
200 gm butter
200 gm castor sugar
3 eggs
150 gm plain flour
1 tsp baking powder
30 gm ground almond
Juice of 1 lemon

Drizzle Topping :
Juice of 1 lemon
60 gm castor sugar

Method

1. Pre-heat oven to 170 deg C.

2. Beat butter and sugar together until pale and creamy.

3. Beat eggs one by one into the creamed butter and sugar. Add a little flour if the mixture starts to curdle

4. Sift flour and baking powder together into a separate bowl. Stir into the creamed mixture, along with ground almond and lemon juice. The mixture should now be thick and creamy.

5. Grease the bottom and side of a 26cm diameter baking pan and line the bottom with baking paper. Spoon the mixture into the pan and smooth the top flat.

6. Bake in the pre-heated oven for about 35 min or until a skewer inserted into the cake comes out clean. The top should be light and springy when touched.

7. While the cake is baking, prepare the lemon drizzle by mixing the juice and sugar in a small bowl.

8. When the cake is taken out of the oven, prick small holes across the top with a bamboo skewer. Slowly pour the drizzle mixture across the entire surface.

9. Cut into wedges and serve on its own or with a scoop of ice-cream.


References : The Sunday Times, 2 May 2010

Chinese Glutinous Rice

Sunday, May 30, 2010

Chinese Glutinous Rice

This is my second time cooking this dish. My family loved it so much the first time (yes, even those fussy tastebuds gave their approval ☺), they gave me the confidence to whip it up again.

This recipe calls for white rice to be mixed with glutinous rice, resulting in a concoction with a softer bite that also does not give rise to a ‘bloated feeling’ after consumption – most welcomed by older folks who are prone to indigestion.

There are many variations to the recipe. You can also consider adding dried shrimp and garnish with pork/chicken floss before serving.


Chinese Glutinous Rice

Ingredients

1½ cups glutinous rice
½ cup white rice
3 Chinese sausages
8 dried mushrooms
½ yellow or white onion
2 stalks green onions
1 cup chicken broth or stock
1 tbsp rice wine
2 tsp soy sauce
1 tbsp oyster sauce

Method

1. Rinse the glutinous rice and soak it overnight in cold water. Do likewise for the dried mushrooms.

2. Chop the onion and green onion. Set the green onion aside in the fridge under a damp paper towel for garnish.

3. Remove the mushroom from the water but keep the soaking liquid. It will be used to cook the rice to infuse it with the mushroom flavor. Remove the mushroom stems and chop the mushrooms finely.

4. Slice the Chinese sausage into quarters lengthwise. Then chop those quarters into small pieces.

5. Heat a large frying pan or wok on medium-high until a drop of water sizzles. Combine the sausage, onion and mushrooms and place in the pan. Do not add extra oil because the sausage has plenty of fat to fry the mushrooms and onions. Add rice wine and stir-fry until the onions have turned golden brown, about 5 minutes. Add soy sauce and oyster sauce to the mixture. Be careful not to add too much, although at this point it will be excessively salty because it will also flavour the rice later. Stir fry till the onions have softened and that the sausage has browned nicely. Dish up the mixture and set aside.

6. Drain the rice and put into a medium to large pot with a lid. Pour in equal parts of the liquid used to soak the mushrooms and chicken broth. The liquid should just cover the rice. Cover the pot, keeping the lid to one side to let a small opening for steam to escape. Turn the heat to medium-low.

7. When the rice has absorbed some of the liquid, spoon the fried mixture over the rice. Do not stir or otherwise disturb the rice as it is will not be sufficiently cooked yet. Cover the pot and let it cook for an additional 10 minutes or so.

8. When the rice has finished cooking and absorbed all of the free-standing liquid, stir the rice to incorporate all the ingredients together. If necessary, add additional oyster sauce to taste.

9. Garnish with green onion and serve.


Reference : Destination Eats

Pineapple Tarts

Sunday, January 10, 2010

Pineapple Tarts Unbaked

Two of my must-have Chinese New Year goodies are open-faced pineapple tarts and love letters. For as far back as I can remember, I have been getting my fix from the same stalls because so many have failed the test of my taste buds :)


Pineapple Tarts Baked

This year, I decided to be a little more ambitious and make my own pineapple tarts. I have been told that the reason for their high price is its associated difficulty in making them and so, I decided to make a small batch in my first attempt…just in case…

I was heartened to discover that it was not too difficult really. That first batch also gave me plenty of opportunity to further refine the recipe for tarts better-suited to my family’s taste. The original recipe produced a batch of pineapple filling that gave too much of a sugar rush and I have reduced the amount of sugar as I used honey pineapples. I have also added some salt to the pastry to give a better taste.

Along the way, I have also picked up some useful tricks that made the process easier and I have included them in the revised recipe below. The pineapple filling can be made in advance and chilled. Should the pineapple filling become too sticky to roll between palms, pop it into the refrigerator for a couple of minutes to chill and harden slightly.

We love the homemade pineapple tarts and will be making more batches.


Pineapple Tarts


Ingredients

Pastry:
450 gm plain flour
50 gm milk powder
250 gm butter
1 egg, lightly beaten
2 tbsp iced water
a pinch of salt
a few drops yellow colouring (optional)

Filling:
4 cups lightly-blended
pineapple (gently squeeze out some juice)
3 cups sugar
2
cloves
½ inch
cinnamon stick


Method

Filling :

1. Place all ingredients into
wok or heavy pan.

2. Cook for about 1- 1½ hour over medium heat, stirring occasionally till mixture turns thick and sticky. Allow to cool, then use a cling film to seal and chill in refrigerator.


Pastry :

3. Rub butter into flour and milk powder lightly with fingertips till mixture resembles breadcrumbs. Add beaten egg, water and colouring. Mix lightly, do not overmix.

4. Turn out onto lightly floured surface and roll out thinly (about 7mm thickness). Cut with round pastry cutter. Roll out remaining pastry and use a knife to cut into thin strips.

5. Roll a teaspoon of pineapple into a small ball. Flatten it slightly and place it in the centre of each pastry. Place the pastry strips over the tarts.

6. Bake in preheated oven 160oC for 10 min on middle rack. Remove the tray and glaze the tops of the tarts.

7. Rotate the tray and place it into oven and bake at 150oC for 10-15 min till light brown in colour.

8. Cool completely before storing in sealed container. If stacking tarts in layers, separate each layer with parchment paper.


Reference : Jthorge’s Kitchen

Book Review : Dead Heat

Friday, January 8, 2010

Dead Heat


My delight was doubled when I picked up Dead Heat by Joel Rosenberg at the library. On first sight, I thought it would be another thriller action novel, along the likes of Dan Brown and James Rollins. The book is a page-turner with its suspense and playout of end-time prophecies.

From the time I had a taste of James Rollins and his mastery in incubating fact with fiction to hatch a fascinating tale of thrilling action, I got hooked onto this style of writing. And so, now Rosenberg presented me with another series of books written along a similar vein. I love how the authors threaded real fact with imagination to weave an almost credible story bordering on real-life investigative work. Some of the plots and subplots mentioned in their books bring a thrill along your spine as they hint of a sinister slant to real world events.

Dead Heat is a roller-coaster ride that had me gripping the political thriller till the end and then, left me rushing to get hold of its earlier prequels. It brings into play Biblical prophecies of the end-times (or eschatology) and shares bone-chilling insights to how it parallels with world happenings as they unfold. What is scarier is that, each of the 5 books in the series was written/published just before the major events mentioned in them happened in our world.

Verdict : 9/10. Two thumbs up!

A New Year Dawns

Friday, January 1, 2010

Time flies, the past year’s events seemed to have sped by and we have stepped into another brand new year.

As I read my thoughts at the start of 2009, I reflected on the experiences my family has had in the past year and all I can say is that God was with us through it all. Several major events still linger vividly in my mind and together with many other small seemingly insignificant incidents, they create a tapestry of God’s faithfulness and goodness.

To list some of the memorable events in 2009 here will serve to journal the milestones of 2009.

• Hubby’s eventful year in the marketplace – I am reminded of how we have grown in the Lord and the effective usage of prayer as both a weapon and as a shield.

• My adventures in the kitchen – I am surprised that I have a genuine lasting interest in cooking and baking

• Our selection as parent volunteers at a preferred primary school for Big Buddy – the song “God will make a way” rings loud and clear.

• My onward journey as a Christian leader in my church – I am once again a carecell leader

• New selling strategies in my business – God opens windows when the doors seem to be closed.

• Our 10th Wedding Anniversary celebrations – a second honeymoon and a family photo-shoot session commemorate the special year for us

• Christmas parties with a personal touch – for the first time, I added personal touches to the invitation, menu and program as hosts for a large party


The woven threads of colourful past experiences culminates in a trust that 2010 will be a sweet year in the Lord. There are several decisions to be made this year in conjunction with how my family life will evolve this year. I harbour dreams and desires that in the course of the year, I hope to see come to past. Dear God, I know not how but I know that You can make it happen.

Let the year 2010 surely be a Year of Celebration for my family!